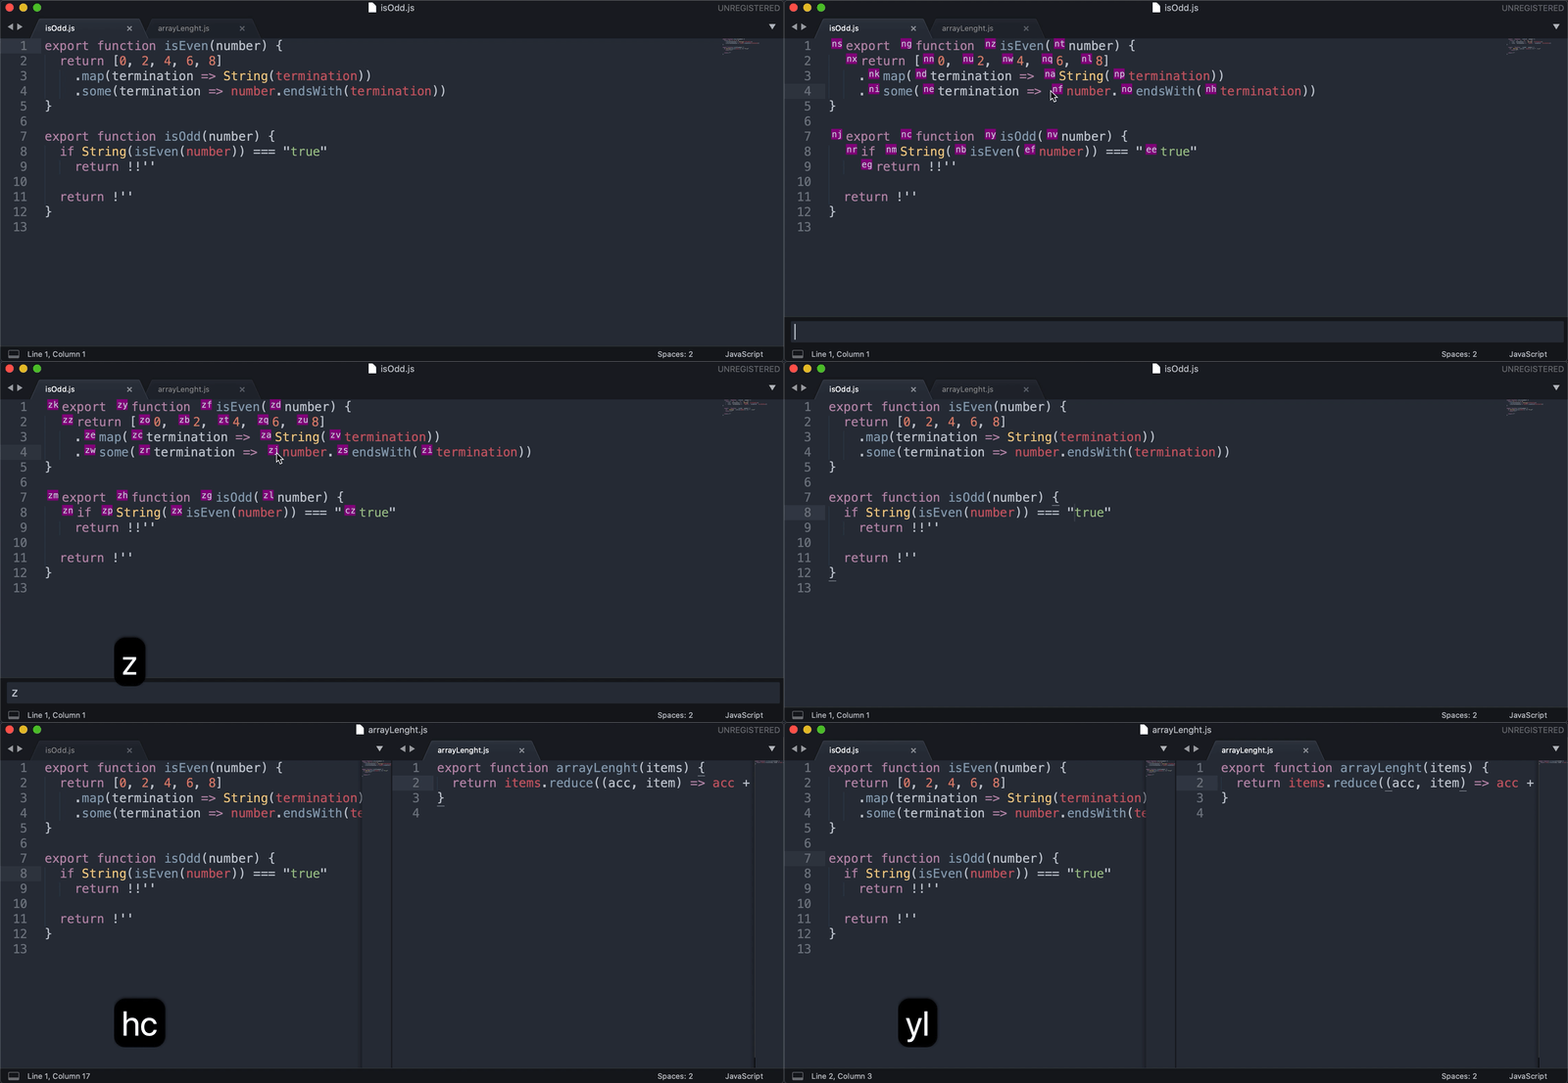
Jumpy
Create dynamic hotkeys to jump around files and across visible panes.
Details
Installs
- Total 374
- Win 171
- Mac 128
- Linux 75
| Feb 17 | Feb 16 | Feb 15 | Feb 14 | Feb 13 | Feb 12 | Feb 11 | Feb 10 | Feb 9 | Feb 8 | Feb 7 | Feb 6 | Feb 5 | Feb 4 | Feb 3 | Feb 2 | Feb 1 | Jan 31 | Jan 30 | Jan 29 | Jan 28 | Jan 27 | Jan 26 | Jan 25 | Jan 24 | Jan 23 | Jan 22 | Jan 21 | Jan 20 | Jan 19 | Jan 18 | Jan 17 | Jan 16 | Jan 15 | Jan 14 | Jan 13 | Jan 12 | Jan 11 | Jan 10 | Jan 9 | Jan 8 | Jan 7 | Jan 6 | Jan 5 | Jan 4 | |
|---|---|---|---|---|---|---|---|---|---|---|---|---|---|---|---|---|---|---|---|---|---|---|---|---|---|---|---|---|---|---|---|---|---|---|---|---|---|---|---|---|---|---|---|---|---|
| Windows | 0 | 0 | 1 | 0 | 0 | 0 | 0 | 0 | 0 | 0 | 0 | 0 | 0 | 0 | 0 | 0 | 0 | 0 | 0 | 1 | 0 | 0 | 0 | 0 | 0 | 0 | 0 | 0 | 0 | 0 | 0 | 0 | 0 | 0 | 0 | 0 | 0 | 1 | 0 | 0 | 0 | 0 | 0 | 0 | 0 |
| Mac | 0 | 0 | 0 | 0 | 0 | 0 | 0 | 0 | 0 | 1 | 0 | 0 | 0 | 0 | 0 | 0 | 0 | 0 | 0 | 0 | 0 | 0 | 0 | 0 | 0 | 0 | 0 | 0 | 0 | 0 | 0 | 0 | 0 | 0 | 0 | 0 | 0 | 0 | 0 | 0 | 0 | 0 | 0 | 0 | 0 |
| Linux | 0 | 0 | 0 | 0 | 0 | 0 | 0 | 0 | 0 | 0 | 0 | 0 | 0 | 0 | 0 | 0 | 0 | 0 | 0 | 0 | 0 | 0 | 0 | 0 | 0 | 0 | 0 | 0 | 0 | 0 | 0 | 0 | 0 | 0 | 0 | 0 | 1 | 0 | 0 | 0 | 0 | 0 | 0 | 0 | 0 |
Readme
- Source
- raw.githubusercontent.com
jumpy-sublime
An equivalent of Atom's Jumpy package that creates dynamic hotkeys to jump around files and across visible panes, for Sublime Text.

Installation
Step 1: download package
Option 1: using Package Control
Open the Command Palette:
- on PC: shift+control+P
- on Mac: shift+command+P
Select Package Control: Install Package.
Select Jumpy.
Option 2: using GIT
git clone "https://github.com/jgburet/jumpy-sublime.git" \
    "~/Library/Application Support/Sublime Text 3/Packages/Jumpy" # <-- MacOS destination
Step 2: configure bindings
Jumpy does not come with predefined bindings so you'll need to define yours.
Go to Preferences > Key Bindings. Complete the file with this line:
[
    { "keys": ["shift+enter"], "command": "jumpy", "context": [{ "key": "panel_has_focus", "operand": false }] }
]
Customization
Jumpy lets you customize the Regex used to identify where to put labels, as well as their CSS, so you can choose how they look like. Two entries are available for change: jumpy.label_css and jumpy.regex.
Go to Preferences > Settings and set them to your preference.
Jumpy also handles syntax specific configurations (Preferences > Settings - Syntax Specific). This means that it can behave differently between two files, even if they are opened & visible in the same window.
This comes handy where the Regex used does not suits perfectly your syntax. For example, you might enhance it so kebab-cased CSS properties are not identified as several words.
Example:
"jumpy.label_css": "background-color: color(var(--redish) min-contrast(var(--background) 2.5)); font-size: 0.7rem;",
"jumpy.regex": "\\w+",
Notes:
- the regex is escaped.
- the whole CSS is overwritten, not just what collides.
- it is prefered to use variables so colors can match your color scheme.
A link that might help you:
- https://www.sublimetext.com/docs/minihtml.html#css:ver-dev
TODO
Improve labels
Right now, labels are displayed using phantoms. When displayed, they shift your text. It's annoying.
I'd prefer to edit the buffer but this complexifies A LOT how the package works, having to orchestrate more commands.
Also, there's that to deal with https://github.com/sublimehq/sublime_text/issues/817#issuecomment-95211154.
Multi cursors
Keep current cursors and add new one on selected label.

