TestRSpec
RSpec plugin for Sublime Text 3
Details
Installs
- Total 5K
- Win 590
- Mac 3K
- Linux 894
| Jul 21 | Jul 20 | Jul 19 | Jul 18 | Jul 17 | Jul 16 | Jul 15 | Jul 14 | Jul 13 | Jul 12 | Jul 11 | Jul 10 | Jul 9 | Jul 8 | Jul 7 | Jul 6 | Jul 5 | Jul 4 | Jul 3 | Jul 2 | Jul 1 | Jun 30 | Jun 29 | Jun 28 | Jun 27 | Jun 26 | Jun 25 | Jun 24 | Jun 23 | Jun 22 | Jun 21 | Jun 20 | Jun 19 | Jun 18 | Jun 17 | Jun 16 | Jun 15 | Jun 14 | Jun 13 | Jun 12 | Jun 11 | Jun 10 | Jun 9 | Jun 8 | Jun 7 | |
|---|---|---|---|---|---|---|---|---|---|---|---|---|---|---|---|---|---|---|---|---|---|---|---|---|---|---|---|---|---|---|---|---|---|---|---|---|---|---|---|---|---|---|---|---|---|
| Windows | 0 | 0 | 0 | 0 | 0 | 0 | 0 | 0 | 0 | 0 | 0 | 0 | 0 | 0 | 0 | 0 | 0 | 0 | 0 | 1 | 0 | 0 | 0 | 0 | 0 | 0 | 0 | 0 | 0 | 0 | 0 | 0 | 0 | 0 | 0 | 0 | 0 | 0 | 0 | 0 | 0 | 0 | 0 | 0 | 0 |
| Mac | 0 | 0 | 0 | 0 | 0 | 0 | 0 | 0 | 0 | 0 | 0 | 0 | 0 | 0 | 0 | 0 | 0 | 0 | 0 | 0 | 0 | 0 | 0 | 0 | 0 | 0 | 1 | 0 | 0 | 0 | 0 | 0 | 0 | 0 | 1 | 0 | 0 | 0 | 0 | 0 | 0 | 0 | 0 | 0 | 0 |
| Linux | 0 | 0 | 0 | 0 | 0 | 0 | 0 | 0 | 0 | 0 | 0 | 0 | 1 | 0 | 0 | 0 | 0 | 0 | 0 | 0 | 0 | 0 | 0 | 0 | 0 | 0 | 0 | 0 | 0 | 0 | 0 | 0 | 0 | 0 | 1 | 0 | 1 | 0 | 0 | 0 | 1 | 0 | 0 | 0 | 0 |
Readme
- Source
- raw.githubusercontent.com
Sublime TestRSpec
RSpec plugin for Sublime Text 3.
Run, navigate and create specs from Sublime Text.
Installation
Using Package Control:
- Run “Package Control: Install Package” command, find and install
TestRspec. - Define key bindings (see Configuration section below).
- Restart Sublime Text.
Manually:
- Clone this repository into your packages folder (in Sublime Text: Preferences -> Browse Packages).
- Define key bindings (see Configuration section below).
- Restart Sublime Text.
Configuration
TestRSpec tries its best to autodetect how to run RSpec. However, you might need to make adjustments to plugin's configuration if you have an uncommon setup.
There are no key bindings enabled by default. Go to Preferences -> Package Settings -> TestRSpec -> Key Bindings to define key bindings.
Find settings in Preferences -> Package Settings -> TestRSpec.
Features
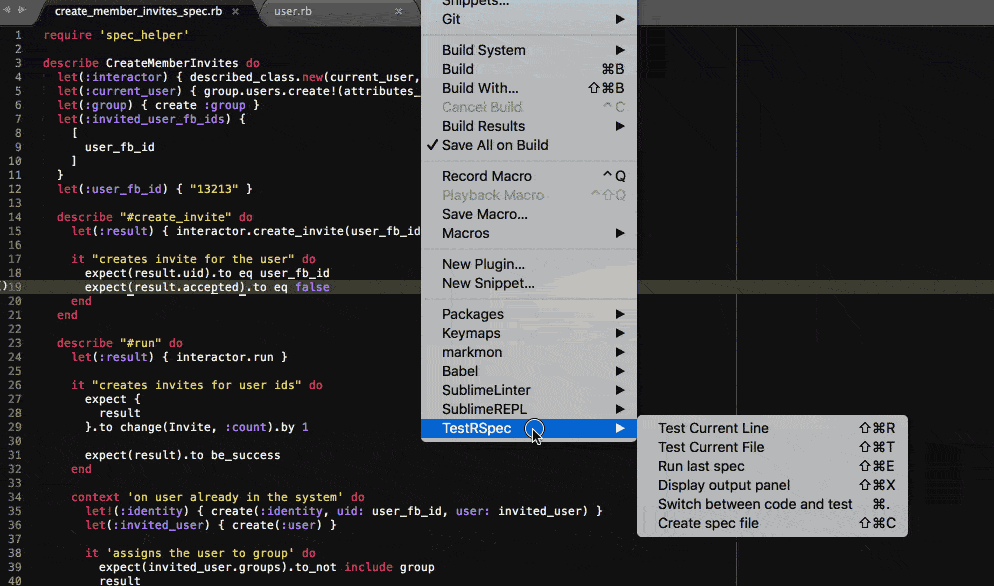
Run RSpec
Launch RSpec for:
- Current file
- Current line
- Rerun last run spec
Switch between code and spec
Jumps from code to spec and vice versa. If there multiple matches, it shows a list with matches.
Create a spec file
Creates a spec file when run in a source file.
Uses code snippet defined in settings (create_spec_snippet).
Copy last ran RSpec command
Copies the command of the last run spec. It can be useful e.g. when you want to debug your application within a 'real' terminal.
Tips
Ignore binding.pry when running specs
Sublime does not allow input in the output panel, so if you add binding.pry, tests get stuck
waiting on input.
To work around this, you can disable the debugger by modifying TestRSpec configuration:
{
  "env": {
    "DISABLE_PRY": "true"
  }
}
Alternatively, use pry-remote.
Troubleshooting
Ruby not found or wrong ruby version used
Example error:
/usr/bin/env: ruby: No such file or directory
Override PATH variable in your shell configuration (~/.bashrc or ~/.bash_profile).
Make sure ruby command runs the right Ruby version in bash.
Alternatively, update package settings with path to ruby, e.g.:
{
  "rspec_add_to_path": "$HOME/.rbenv/shims"
}
Spring is not used
Make sure you have both spring and spring-commands-rspec in your Gemfile.
If you use binstubs, you also need to run
bundle exec spring binstub rspec
Acknowledgments
Inspired by and uses code from https://github.com/maltize/sublime-text-2-ruby-tests
Contribution
Help is always welcome. Create an issue if you need help.
Copyright and license
Copyright © 2016 @astrauka
Licensed under the MIT license.