PreTeXtual
A Sublime Text 2/3 package for PreTeXt files.
Details
Installs
- Total 687
- Win 349
- Mac 208
- Linux 130
| Jul 21 | Jul 20 | Jul 19 | Jul 18 | Jul 17 | Jul 16 | Jul 15 | Jul 14 | Jul 13 | Jul 12 | Jul 11 | Jul 10 | Jul 9 | Jul 8 | Jul 7 | Jul 6 | Jul 5 | Jul 4 | Jul 3 | Jul 2 | Jul 1 | Jun 30 | Jun 29 | Jun 28 | Jun 27 | Jun 26 | Jun 25 | Jun 24 | Jun 23 | Jun 22 | Jun 21 | Jun 20 | Jun 19 | Jun 18 | Jun 17 | Jun 16 | Jun 15 | Jun 14 | Jun 13 | Jun 12 | Jun 11 | Jun 10 | Jun 9 | Jun 8 | Jun 7 | |
|---|---|---|---|---|---|---|---|---|---|---|---|---|---|---|---|---|---|---|---|---|---|---|---|---|---|---|---|---|---|---|---|---|---|---|---|---|---|---|---|---|---|---|---|---|---|
| Windows | 0 | 0 | 0 | 0 | 0 | 0 | 0 | 0 | 0 | 0 | 0 | 0 | 1 | 0 | 0 | 0 | 0 | 0 | 0 | 0 | 0 | 0 | 0 | 0 | 0 | 0 | 0 | 0 | 0 | 0 | 0 | 0 | 0 | 0 | 0 | 0 | 0 | 0 | 0 | 0 | 1 | 0 | 0 | 0 | 0 |
| Mac | 0 | 0 | 0 | 0 | 0 | 0 | 0 | 0 | 0 | 0 | 0 | 0 | 0 | 0 | 0 | 0 | 0 | 0 | 0 | 0 | 0 | 0 | 0 | 0 | 0 | 0 | 0 | 0 | 0 | 0 | 0 | 0 | 0 | 0 | 0 | 0 | 0 | 0 | 0 | 0 | 0 | 0 | 1 | 0 | 0 |
| Linux | 0 | 0 | 0 | 0 | 0 | 0 | 0 | 0 | 0 | 0 | 0 | 0 | 1 | 0 | 0 | 0 | 0 | 0 | 0 | 0 | 0 | 0 | 0 | 0 | 0 | 0 | 0 | 0 | 0 | 0 | 0 | 0 | 0 | 0 | 0 | 0 | 0 | 0 | 0 | 0 | 0 | 0 | 0 | 0 | 0 |
Readme
- Source
- raw.githubusercontent.com
PreTeXtual: a Sublime Text package for PreTeXt
PreTeXtual is a Sublime Text 3 package designed to assist authors using PreTeXt (formerly known as MathBook XML). Parts of it, especially the Vagrant build system, are experimental and may behave unexpectedly.
The package is inspired by the excellent LaTeXTools package, which I have enjoyed using for many years. I have borrowed very liberally from the LaTeXTools codebase in order to implement the features I thought would be most useful to MBX authors. Please let me know of any bugs you find or any features you would like to include.
As of version 0.5.0, Sublime Text 2 is no longer supported.
- Installation
- Additional setup to use the automatic build systems
- Read before continuing
- Enable VT-X virtualization
- Install other required software
- A tour of the automated build systems
- Initialize your setup
- Installing the Vagrant box
- Activate the Vagrant box
- Compiling to HTML or PDF
- When compilation fails
- Building images
- Adding new projects
- Keep PreTeXt up to date
- Keep your Vagrant box up to date
- Editing settings manually
- Available settings
- Troubleshooting
- Future plans
- Conclusion
- Keybindings
- Usage
- Known issues
Installation
Note: We assume you are familiar with running Sublime Text commands via the Command Palette. To bring up the palette, hit Ctrl+p (Cmd+p on OS X). Then start typing the name of the command you want to filter the list of results.
It is recommended to install PreTeXtual via Package Control. If you have not installed Package Control yet, you should do that first (and restart Sublime Text afterward).
After Package Control is installed, use the Install Package command (in the
Command Palette) to search for the PreTeXtual package, and select it from the
Quick Panel to install. This method of installation allows Package Control to
automatically update your installation and show you appropriate release notes.
You may also install PreTeXtual via git. Change directories into your
Packages folder. To find the Packages folder, select Browse Packages from
the Preferences menu (from the Sublime Text 3 menu on OS X). Make sure you are
in the Packages folder and not Packages/User.
Then, run
git clone https://github.com/daverosoff/PreTeXtual.git
and restart Sublime Text (probably not necessary).
Additional setup to use the automatic build systems
PreTeXtual now comes with build systems that can process your PreTeXt source into HTML or LaTeX and build your latex-image images into all image formats. The result is output that is ready to preview in a browser (HTML) or compile to PDF (LaTeX). All of this can be done from the command palette, if you carefully follow the directions below.
Read before continuing
The build systems are also intended for beginning PreTeXt users, who may wish to just get started as soon as possible without working too hard on configuration or learning too much. So none of the possible configuration one can do is described here at present. PreTeXtual can do things more flexibly than described here, but this documentation has been written for simplicity and the details are omitted.
The build systems are intended only for Windows users, since PreTeXt is much more difficult and tedious to install on Windows than on Linux or Mac OS. As of this release, it has only been successfully used on Windows 10. Windows 7 users are welcome to try to follow the directions, but Windows 7 seems to have some difficulty installing current versions of Vagrant, see below. Future support for Windows 7 is devoutly to be wished.
If your Windows 7 is 32-bits, it is unlikely that you will be able to use the build systems with this version of PreTeXtual. Please open an issue if you need 32-bit support. If there is sufficient demand, it is possible to create compatible Vagrant boxes. (However you will still need to use Vagrant, which may not always play nice with Windows 7, as described above.)
Users of other operating systems will not find the build systems in this release useful without manual editing of some of the package resources. You are welcome to open an issue with questions about how to accomplish this. A future release will support use of the build systems without Vagrant, which is preferable for any Mac OS or Linux users who might want to use the build systems for convenience. Users with custom stylesheets (“thin xsl”) will also benefit.
As you continue with the installation, it would be good to visit this README in a browser so that you can follow along while you do things in Sublime Text and other programs.
A final note before we begin the installation directions: as soon as your project acquires some maturity, you will likely outgrow the build systems in their present form. The present author recommends the use of a virtual machine to continue your PreTeXt work, but there are several different solutions, all of which you are invited to discuss at the pretext-support Google group.
Enable VT-X virtualization
This is the hardest step, regrettably necessary for the current version of PreTeXtual. Feel free to skip it and come back to it later if things don't work properly.
Follow the directions linked below–very carefully! It is possible to really mess up your system doing this. You may want to get help from your institution's IT department. There is always “Quit without Saving” option you can use if you get really stuck or scared.
Windows users will want to follow these directions (step 4 from the directions found here).
- Power on the machine and open the BIOS (as per Step 1). This can usually be
done by pressing the
deletekey, the F1 key or Alt and F4 keys depending on the system. You may have to try a few times. I'm usually not fast enough to get it on the first try. - Open the “Processor” submenu. The processor settings menu may be hidden in the “Chipset”, “Advanced CPU Configuration” or “Northbridge” menus.
- Enable “Intel Virtualization Technology” (also known as “Intel VT”) or “AMD-V” depending on the brand of the processor. The virtualization extensions may be labeled “Virtualization Extensions”, “Vanderpool” or various other names depending on the OEM and system BIOS.
- Enable “Intel VTd” or “AMD IOMMU”, if the options are available.
- Select “Save & Exit”.
Install other required software
Note that the entire installation process from this point onward is documented in the video available at https://mathbook.pugetsound.edu/doc/
At present, the build systems require the use of two other applications, Virtualbox and Vagrant. Install these on your computer. Agree to the default whenever you are prompted for a decision. Not choosing default values will break the PreTeXtual build systems.
- In Sublime Text, use Package Control to install the SideBarEnhancements package and the Vagrant package.
- Download Virtualbox
- Download Vagrant
A tour of the automated build systems
Initialize your setup
At the present moment, the PreTeXtual build systems all make use of a Vagrant virtual machine to do the XSL processing and image building steps of the PTX document generation process. If you don't want to use Vagrant, then this version of PreTeXtual's build systems won't work for you.
You need to organize your projects in a specific way for PreTeXtual to be able
to see and manage them. In particular, you must create a folder called
C:\PreTeXt (it must be on the C: drive). This folder should contain one
subfolder for each writing project you want to work on. Set this up before
continuing.
Note: The rest of the procedure will take quite some time, up to two hours depending on your selections.
Once your folders are set up as described above, open a Sublime Text window
and run the command (from the Command Palette) “Initialize PreTeXt Vagrant”.
Then follow the prompts. Each folder one level underneath C:\PreTeXt will be
recognized as a writing project. These will be added to PreTeXtual's simple
project management system. You can store some options for each project in your
User settings. In particular, you will need to type in a root file path for
each one. The root file of a PreTeXt project is the file containing the
<mathbook> XML element. You will need to enter the paths with double
backslashes \\ rather than a single backslash \. A typical path might look
like
C:\\PreTeXt\\AATA\\src\\aata.xml
Warning. While Windows usually doesn't care much about capitalization in paths, PreTeXtual does. You must enter all letters in your path names with the correct case, or things may not work as desired.
You can always enter the paths later by editing your Settings file directly.
Installing the Vagrant box
Note: this step is required, even if you already have installed PreTeXt in some other way.
After you have finished importing projects as described above, you will see a menu with several choices. Most people will want either “PreTeXt” or “PreTeXt-lite”. If you need Sage or Asymptote, choose “PreTeXt”. If you need a full LaTeX installation but not Sage or Asymptote, choose “PreTeXt-lite”. If you only need to process HTML, you can try “PreTeXt-barebones” (not recommended). The last option, “PreTeXt-no-images”, is only for testing.
The full “PreTeXt” option will take between 45 and 60 minutes, or longer on a slow connection, to download and install. The others will take less time, but even the barebones option might take 10 to 15 minutes. Unfortunately, it is not possible at this time for PreTeXtual to provide any progress bar or feedback. The Sublime Text window may even appear to hang, with a “(Not responding)” message in the title bar. Please don't worry!
Activate the Vagrant box
Note. Perform this step whenever you start working on a PreTeXt project for the first time after a reboot.
In a new Sublime Text window, use the Open Folder command to open your entire
C:\PreTeXt folder. All your projects should appear in the sidebar. Then use
the Command Palette to run the command vagrant up. Wait for the text “Running
Vagrant….” to disappear from the status bar at the bottom of the window before
going on (it may take a minute or two). Alternatively, you may select View/Show
Console from the menu to check the progress of this command, which activates
the virtual machine on which you have installed PreTeXt.
Compiling to HTML or PDF
Now the fun starts. In an existing writing project, open any PreTeXt file.
Make sure that “PreTeXt” is showing in the far lower right corner of the
screen. Some commands will only be available in PreTeXt mode (provided by the
PreTeXtual package). If your source files end in .xml rather than .ptx or
.mbx you will need to do some configuration (use the PreTeXtual: Set
PreTeXt File Exts command, see below).
Having opened a PreTeXt file, bring up the build menu by pressing
Ctrl+Shift+B. Select “Process PreTeXt to HTML” from the menu and
click OK when the notification of processing appears. If you are watching the
sidebar, you will see an output folder appear next to your src folder. If
you expand it in the sidebar you can watch the HTML files appear as they are
generated. When the build is finished, Sublime Text should alert you to this
fact with a dialog box.
Warning. The dialog boxes are not very big or very insistent, but they block Sublime Text from continuing. If you think your editor has crashed, check first for any dialog boxes that may have gotten lost behind another window.
Open the output\html folder and right-click one of the HTML files. Select
“Open in browser”. Marvel at the relative simplicity of this process.
To compile to LaTeX, you can select “Process PreTeXt to LaTeX” from the menu. To convert to PDF, I recommend you use the excellent LaTeXtools package, to which PreTeXtual owes a great deal. A future version of PreTeXtual may support compilation from within Sublime Text without the use of LaTeXtools. You will need to install LaTeX on your computer to perform this step, not presently documented here.
When compilation fails
PreTeXtual is not, at present, smart enough to realize when anything has gone
wrong. You will notice that your output isn't there, or didn't change; a very
quick “Build finished” dialog also usually indicates an error. To see the
messages PreTeXt generates when processing your source, use the Sublime Text
console: select Show Console from the View menu before, during, or after
compilation.
Building images
Note. This part of the build system may still be a bit buggy. In addition, it
will fail if you chose pretext-barebones or pretext-no-images above. It can
be time-consuming, especially for longer documents. Finally, some Asymptote 3D
images are not yet supported and raise exceptions that will stop the image build
process.
Note. Including images that are not generated from source is not yet supported. If you urgently need this feature, open an issue.
Building images should be as simple as processing to HTML or LaTeX. Use the Ctrl+Shift+B menu to select a “Build images” command (this will take a while if you have a large project). Dismiss the dialogs that appear as the images are generated and do not be alarmed if Sublime Text should appear to hang or become unresponsive. Just wait! After the final message “End of PreTeXtual build routine”, you can refresh your HTML output in the browser to check that the images appear. They will now also be available for LaTeX compilation.
This concludes the tour of the build system. Run vagrant suspend in a command
shell before shutting down your system. This pauses the virtual machine in
a non-destructive way. Windows will complain that something is
stopping you from shutting down your computer otherwise—in fact, it may do
so anyway, but forcing a shutdown will not cause any problems to the virtual
machine (you can simply throw it away and create a new one if you need to).
Note. If you wait a few minutes after running vagrant suspend
you should not get any error from Windows when you shutdown.
Adding new projects
Currently, there is no separate command to add a project. The best way to do it by hand is to manually edit your Settings file, as described below.
Keep PreTeXt up to date
PreTeXt is actively developed and changes frequently. To keep your installation up to date, you should update it every few weeks. This may require some changes to your source.
From the Command Palette, run the command PreTeXtual: Update PreTeXt. If it
is not available, try saving an empty file with the .ptx extension and try
again from within this file. You may see a new window open with some
git-related hieroglyphics. Just wait for it to close. All done!
Keep your Vagrant box up to date
Although it may never be necessary, it is probably a good idea to keep your
Vagrant box updated (new versions come out in the first week of each calendar
month). The simplest way to update it is to run the command Vagrant: Destroy &&
Up from the Command Palette. You can also use the command vagrant box update
from any command prompt (make sure to change to the C:\PreTeXt folder first).
Editing settings manually
All the PreTeXtual information is stored in the pretext_projects setting in
your User settings file. To edit it, select “Preferences/Settings” from the
Sublime Text 3 menu. A new Sublime Text window with two panes will appear. The
left side is for reference only and should not be edited. In the right side,
you should be able to find the pretext_projects setting. You can change the
values and save the file as you wish.
Available settings
name: each project has an internal id calledname. By default this is the same as the name of the directory it lives in.path: each project knows the path to its directory. You need to escape the backslashes (enter each backslash as\\).root_file: each project knows the absolute path to its root file.xinclude: (default: True) if you would like to disable thexincludebehavior for some reason, set this value tofalse(note: no quotes).stringparam: if you need some custom stringparams, enter them here as a dictionary/hash of key-value pairs:"stringparam": { "html.css.file": "https://www.my.site/path/to/my.css", "latex.font.size": "20pt" }(experts only) There are a few other settings that PreTeXt will recognize that are not yet documented here. Inspect the file
beta_process.pyto find out more about them.
Troubleshooting
As mentioned elsewhere, this system is still experimental, although it has
been tested to some extent. If you run into problems or things don't work as
expected, you will probably need to get some help, but one thing to try first
is to use the Sublime Text console to see what's going on. Enable the console
with View/Show Console from the Sublime Text menu. A new pane will appear
that updates you in real time on what Sublime Text is doing. In particular, if
PreTeXtual is throwing errors that the author hasn't anticipated, you will see
the error messages in the console. These messages will be helpful in debugging
your situation.
You can dismiss the console by putting the cursor in it and hitting
Esc, or by using View/Hide Console.
Future plans
We would like to support generation of thumbnails/static images for videos and interactives. It might also be possible to provide some support for compiling documents using WeBWorK/MyOpenMath problems, although it may end up being the case that heavy use of these features means your project has “outgrown” the Vagrant build system. In that event you will be best served by another way of using PreTeXt.
Documentation of the Vagrant build system, and in particular the “graduation” process when a project is sufficiently mature/advanced, is still spotty. We have chosen to release it along with the present document and the video demonstrations in the interest of getting people started more quickly. The author is actively working on the documentation and welcomes your contributions.
Conclusion
This concludes the section of the documentation about the build system. Thank you for reading and please address questions to the pretext-support Google group:
https://groups.google.com/forum/#!forum/pretext-support
or open an issue at
https://github.com/daverosoff/PreTeXtual/issues
The remainder of this document pertains to the other features of the PreTeXtual package.
Keybindings
PreTeXtual is inspired by LaTeXTools, and like that package uses a Ctrl+l prefix for many commands. The Expand Selection to Line command is bound to Ctrl+l by default. PreTeXtual rebinds that command to Ctrl+l, Ctrl+l. Note that this is a keyboard shortcut consisting of two separate keystroke combinations. Most PreTeXtual shortcuts are like this.
Usage
You can activate the package features by enabling the PreTeXt syntax. The
syntax definition looks for .ptx or the legacy .mbx file extension. If
your PreTeXt files end with .xml (or something else), you have several
choices.
Use the Preferences menu or the Command Palette to run the command
Set
PreTeXt File Extensions
, and use the input panel to add.xmlor other extensions of your choice to the comma-separated list. Sublime will look for a project settings file first, then update user preferences if it doesn't find one. If you have multiple PreTeXt projects, or if you edit XML other than PreTeXt, it is best to start using Sublime Text projects so that you can have project-specific settings.Enable the syntax manually using the command palette. To enable it manually, open a PreTeXt file and press Ctrl+Shift+P (Cmd+Shift+P on OS X) and type
ptx. SelectSet Syntax: PreTeXtfrom the list of options.
You should see the text PreTeXt in the lower right corner if you have
the status bar visible (command palette: Toggle Status Bar). Please excuse
the image which still shows the former name PreTeXt.
Here is a (non-exhaustive) list of features.
New in 0.6.0: an extensive interface with Vagrant virtual machine management software is included, to enable Sublime Text 3 to behave more like an API for PreTeXt. See the related section of this README for more information.
If you have some subdivisions (with
xml:id) in your PreTeXt file, hit Ctrl+R (Cmd+R on OS X) to run the Goto Symbol command. You should see a panel showing all your available sections. Select one to jump to it in the active view. This tool does not index subdivisions without anxml:idattribute.
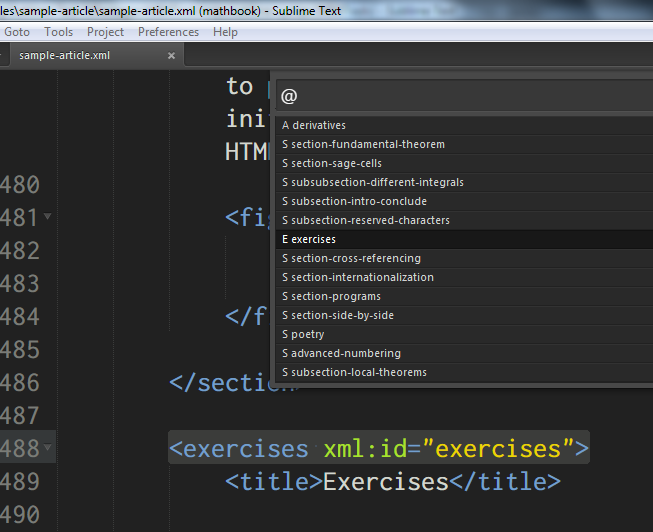
Open your entire source folder as a project and use Goto Symbol in Project (Ctrl+Shift+R/Cmd+Shift+R) to see all the
xml:idfor all the PreTeXt files in the project (must use.mbxor.ptxextension for indexing to succeed).Try typing
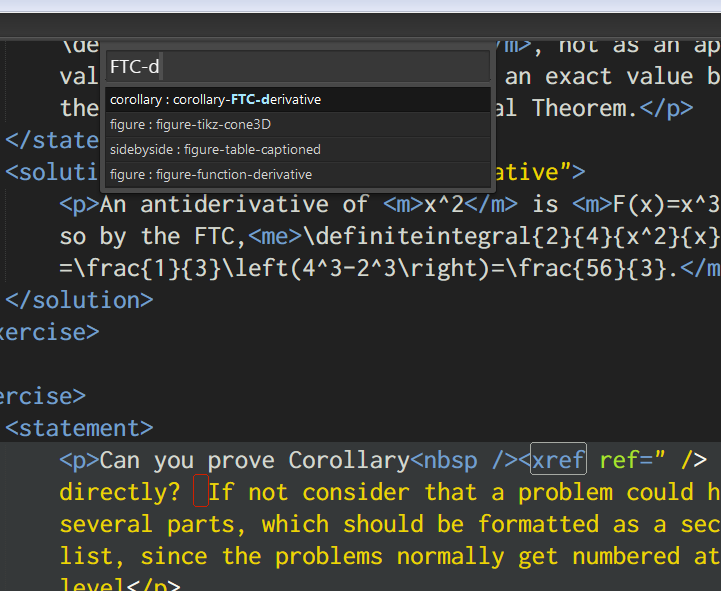
<xref ref="(the beginning of a cross-reference). Sublime Text should show you a panel containing all xml:id values along with the elements they go with. Choose one to insert it at the caret and close thexreftag. Alternatively, typerefand hit Tab to activate thexrefsnippet. Then hit Ctrl+L, X or Ctrl+L, Ctrl+Space to bring up the completions menu. There are several variants of therefsnippet, namelyrefa,refp, andrefpa.
If you set a PreTeXt root file, then ref completion as described above will recursively search for
xml:idthrough all yourxi:includesstarting with the indicated root file. Run the command “Set PreTeXt Root File” from the Preferences menu or the Command Palette. Be sure to use an absolute path name for the value of the setting, as well as forward slashes (yes, Windows too).Type
chp,sec,ssec, orsssecand hitTabto activate the subdivision snippets. A blanktitleelement is provided and the cursor positioned within it. As you type, thexml:idfield for the subdivision is filled with similar text mirroring the title you are entering.
Known issues
- There are quite a few edge cases and bugs in the build system left to fix in the next version.
- The root file detection is ambiguous. There is a systemwide PreTeXt root file used for generating symbol lists, but this is ignored by the build systems. They use a completely different setting scheme for finding the root file of a project. The documentation does not adequately address this.
- The
refsnippet does not bring up the quick panel. Should it? - Some of the snippets could be improved.
- Symbol finding could be improved.