
TermMate
agentic AI coding assistant supporting claude code, ChatGPT codex, Antigravity, OpenCode and Pi coding agent; with API provider OpenRouter Gemini DeepSeek
Details
Installs
- Total 572
- Win 226
- Mac 214
- Linux 132
| Oct 13 | Oct 12 | Oct 11 | Oct 10 | Oct 9 | Oct 8 | Oct 7 | Oct 6 | Oct 5 | Oct 4 | Oct 3 | Oct 2 | Oct 1 | Sep 30 | Sep 29 | Sep 28 | Sep 27 | Sep 26 | Sep 25 | Sep 24 | Sep 23 | Sep 22 | Sep 21 | Sep 20 | Sep 19 | Sep 18 | Sep 17 | Sep 16 | Sep 15 | Sep 14 | Sep 13 | Sep 12 | Sep 11 | Sep 10 | Sep 9 | Sep 8 | Sep 7 | Sep 6 | Sep 5 | Sep 4 | Sep 3 | Sep 2 | Sep 1 | Aug 31 | Aug 30 | Aug 29 | |
|---|---|---|---|---|---|---|---|---|---|---|---|---|---|---|---|---|---|---|---|---|---|---|---|---|---|---|---|---|---|---|---|---|---|---|---|---|---|---|---|---|---|---|---|---|---|---|
| Windows | 8 | 3 | 2 | 1 | 7 | 3 | 0 | 3 | 3 | 0 | 5 | 3 | 1 | 2 | 6 | 2 | 2 | 5 | 5 | 0 | 3 | 5 | 4 | 1 | 0 | 0 | 0 | 3 | 3 | 2 | 0 | 2 | 4 | 0 | 2 | 6 | 9 | 4 | 2 | 1 | 3 | 2 | 3 | 2 | 0 | 0 |
| Mac | 0 | 3 | 2 | 0 | 1 | 2 | 2 | 0 | 3 | 2 | 2 | 3 | 1 | 2 | 3 | 1 | 2 | 5 | 3 | 2 | 3 | 2 | 4 | 1 | 1 | 2 | 0 | 3 | 1 | 2 | 1 | 2 | 3 | 5 | 3 | 5 | 4 | 1 | 1 | 1 | 3 | 3 | 2 | 1 | 2 | 2 |
| Linux | 3 | 2 | 3 | 0 | 0 | 0 | 1 | 3 | 4 | 0 | 0 | 2 | 2 | 0 | 1 | 0 | 2 | 2 | 4 | 1 | 1 | 2 | 0 | 1 | 0 | 0 | 3 | 2 | 0 | 2 | 1 | 0 | 2 | 1 | 3 | 5 | 2 | 4 | 2 | 2 | 0 | 2 | 2 | 1 | 0 | 2 |
Readme
- Source
- raw.githubusercontent.com
TermMate — Agentic Coding Assistant for Sublime Text


Claude Code, OpenAI Codex, Google Antigravity, OpenCode, and Pi coding agents for Sublime Text
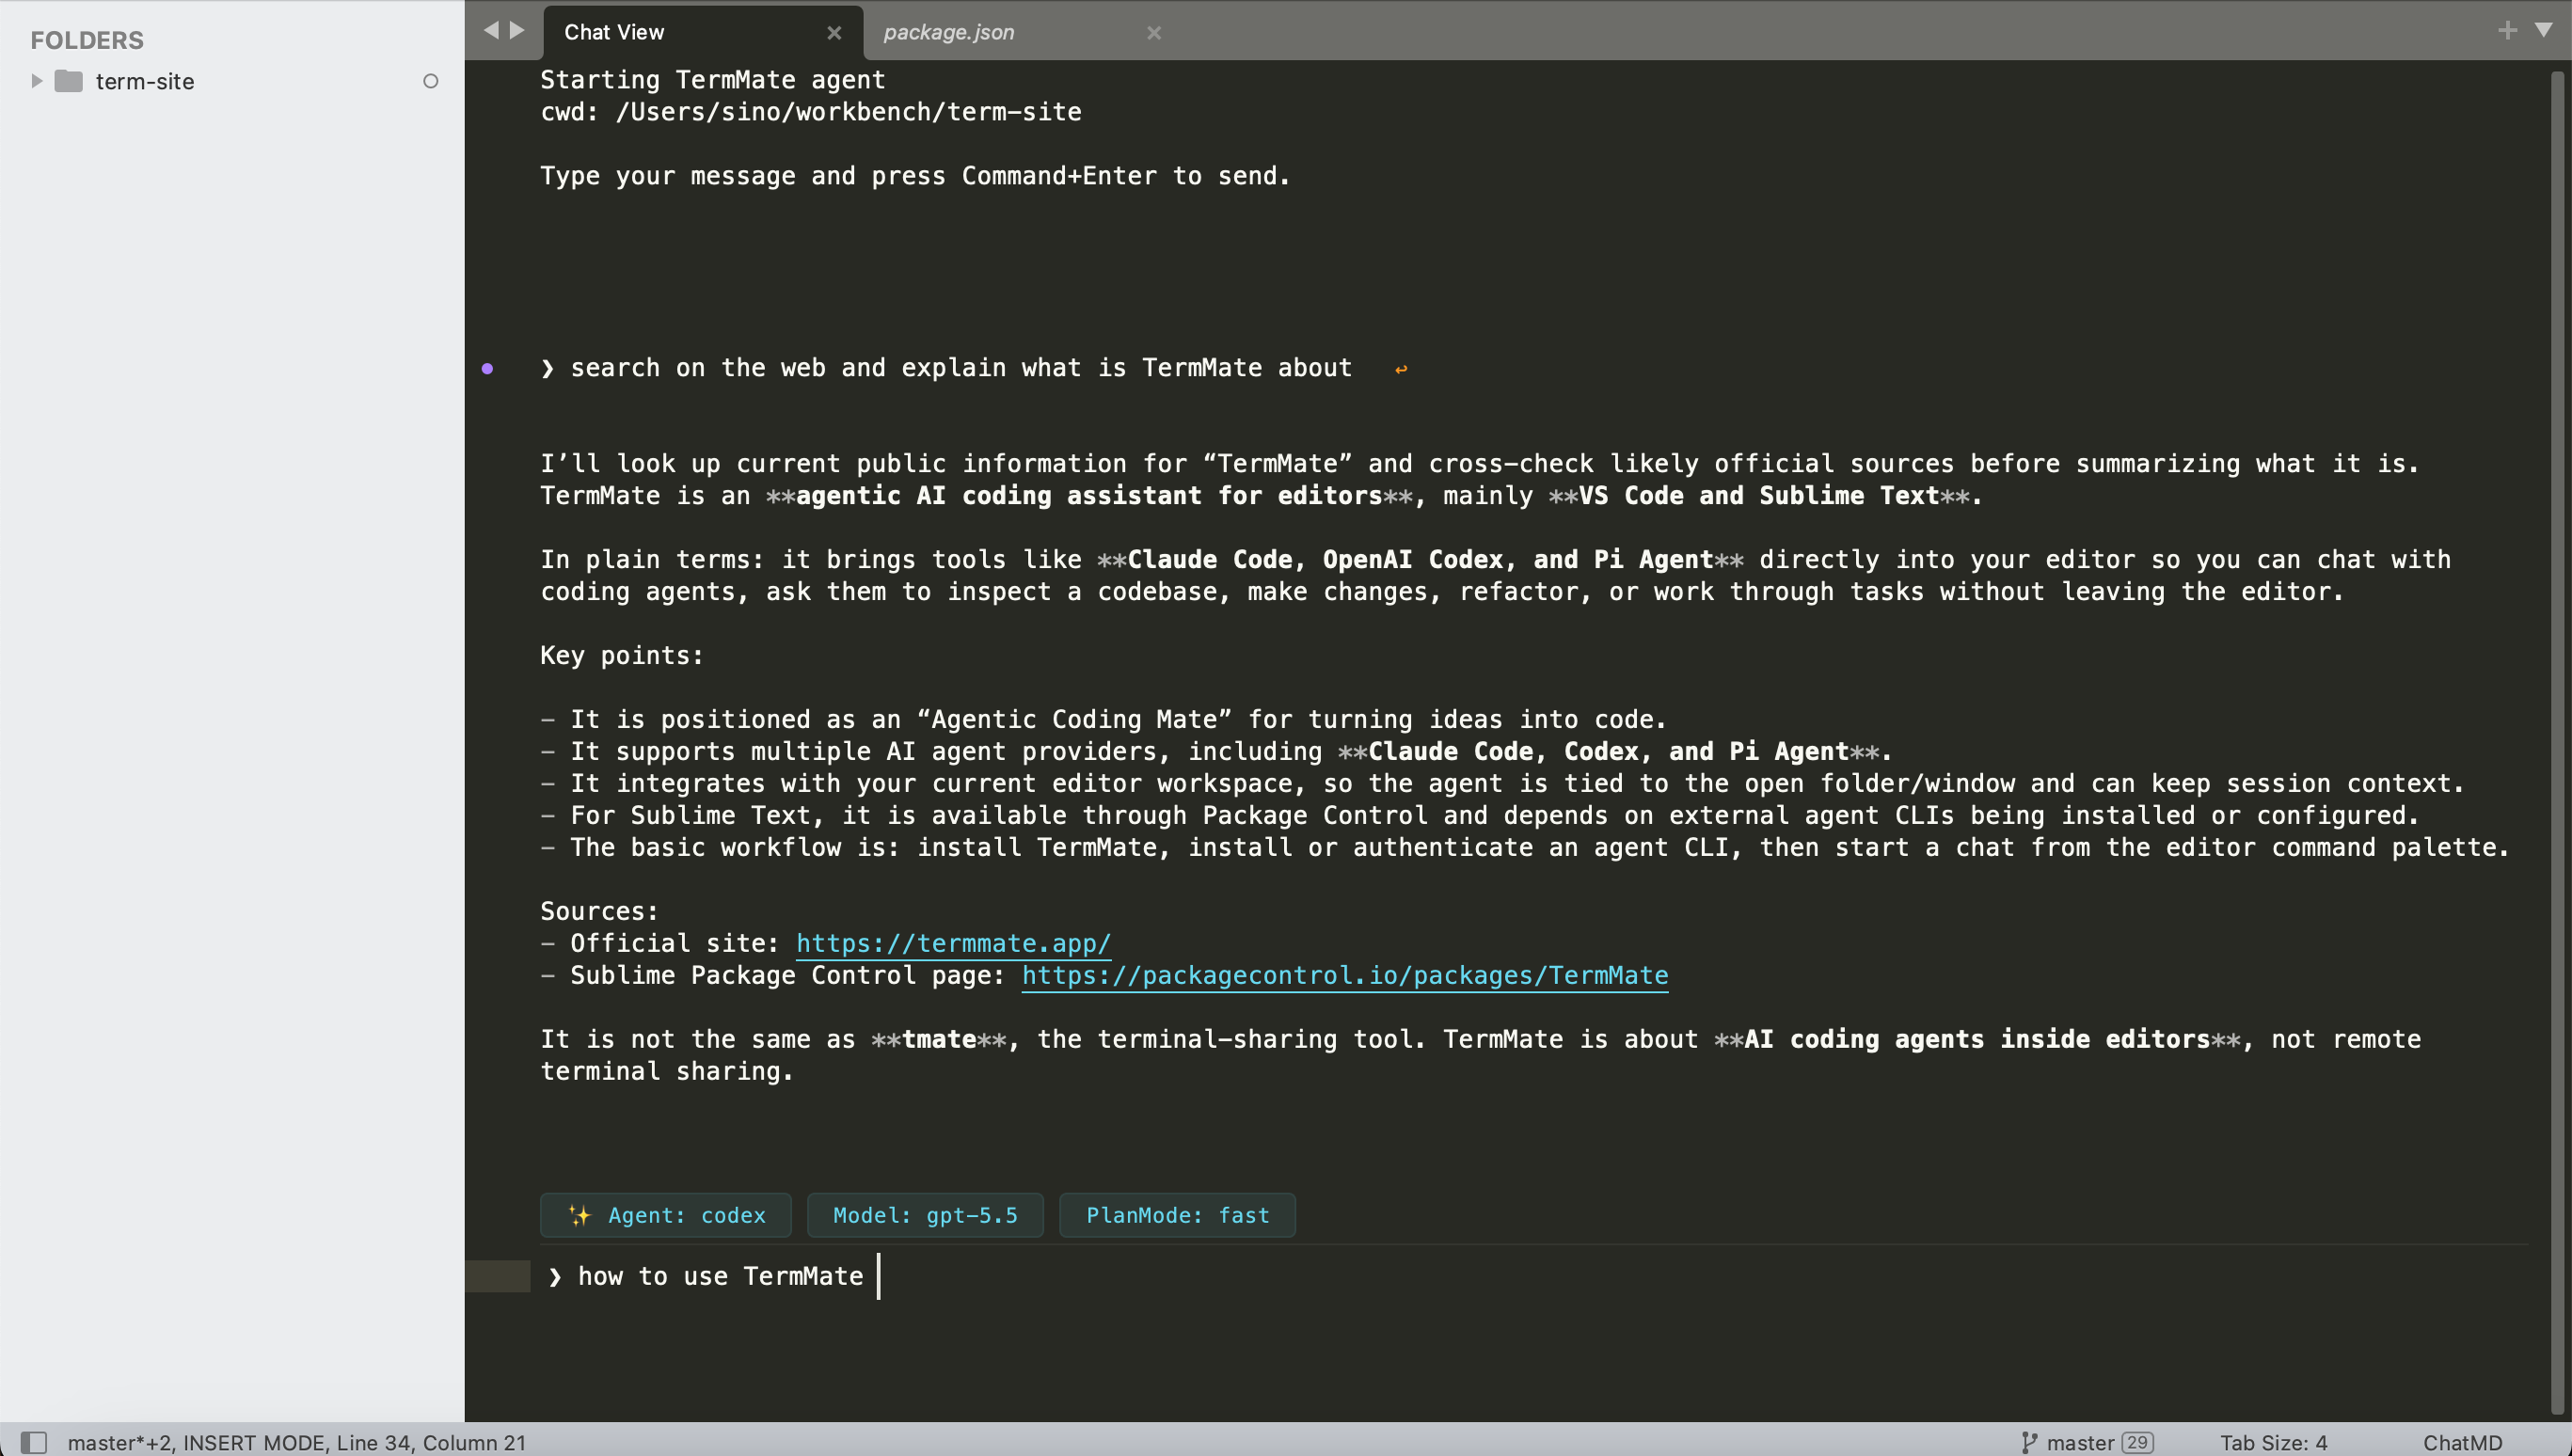
TermMate is a professional AI coding agent for Sublime Text that supports multi-agent providers, including Claude Code, Codex, Google Antigravity, OpenCode, and Pi Agent. It builds a seamless native agentic interface directly within your editor for autonomous task execution, codebase exploration, and smart refactoring. Instead of using conventional webview, TermMate provides editor-native, REPL-inspired chat interface with modern editor features such as goto-navigation, auto-complete, folding, file links.
See TermMate agentic coding features — live demo here →
TermMate's main agentic features include:
- autonomous coding workflow - let agents explore your codebase, run commands, edit files, and complete tasks directly in Sublime Text.
- editor-native chat - plan tasks, follow tool execution, approve agent actions, and review changes in an editor-native interface.
- workspace awareness - reference files, line ranges, selections, and multi-level directory paths with cascading smart
@completion and sidebar actions. - session management - start fresh, resume previous conversations, or rewind and branch from earlier prompt.
Getting Started
1. TermMate Installation
Install TermMate via Package Control:
- Open the Command Palette (
Cmd+Shift+Pon macOS,Ctrl+Shift+Pon Windows/Linux). - Type
Package Control: Install Packageand pressEnter. - Search for
TermMateand pressEnter.
2. Install Agent CLI
If Claude Code, Codex, Google Antigravity, OpenCode, or Pi Agent is already installed and authenticated, skip this step. TermMate automatically detects existing CLI installations and uses their current authentication — no extra setup needed.
Otherwise, the easiest way is to install directly from within Sublime Text: open the Command Palette, type TermMate: Install Agent, and select the agent you want. TermMate will run the installation in dedicated panel and notify you when it's complete. CLIs are installed to ~/.local/bin on macOS/Linux and %APPDATA%\npm on Windows.
Alternatively, manually install an agent from your terminal:
# Claude Code
curl -fsSL https://claude.ai/install.sh | bash

# Codex (macOS/Linux)
curl -fsSL https://chatgpt.com/codex/install.sh | sh
# Codex (Windows PowerShell)
powershell -ExecutionPolicy ByPass -c "irm https://chatgpt.com/codex/install.ps1 | iex"

# Google Antigravity (macOS/Linux)
curl -fsSL https://antigravity.google/cli/install.sh | bash
# Google Antigravity (Windows PowerShell)
powershell -ExecutionPolicy ByPass -c "irm https://antigravity.google/cli/install.ps1 | iex"

# OpenCode (macOS/Linux)
curl -fsSL https://opencode.ai/install | bash
# OpenCode (Windows)
npm install -g opencode-ai

# Pi Agent
curl -fsSL https://pi.dev/install.sh | sh
Note: TermMate automatically detects CLI installation paths across multiple environments, including Homebrew, npm-global, Yarn, and common local binary directories. You typically don't need to manually configure environment variables or search paths.
3. Authentication
Authenticate the agents via your terminal, or skip the CLI login by setting API keys directly in TermMate's settings — see Custom Environment Variables.
# Claude Code
/login

# Codex
codex login

# Google Antigravity
agy

# OpenCode
/connect

# Pi Agent
/login
Alternatively, you can use env settings to skip the CLI login. Open the settings file via Preferences → Package Settings → TermMate → Settings and add env:
{
    "env": {
        "GEMINI_API_KEY": "your-gemini-api-key"
    }
}
The example above sets GEMINI_API_KEY for Pi Agent authentication.
4. Start Chat
- Open the command palette (
Cmd+Shift+Pon macOS,Ctrl+Shift+Pon Windows/Linux). - Type
TermMate: Start Chatand pressEnter. - A new chat view will open for the TermMate chat.
- Type your message and press
Cmd+Enter(macOS) orCtrl+Enter(Windows/Linux) to send. You can even edit prompts in Vim mode.
You can stop a running conversation at any time. Use the shortcut Cmd+Escape (Mac) / Shift+Escape (Windows/Linux) in the chat window, or run TermMate: Stop Conversation from the command palette.
For a detailed guide, see the TermMate Documentation
Have questions or feedback, join the Sublime Forum discussion
Usage & Key Features
1. Chat with Agent about Current File or Selection
Right-click on any file or text selection and choose TermMate: Chat with Agent to send it as context for your next prompt. This will:
- Open the TermMate chat view (if not already open).
- Insert a reference to the file (
@filename) or selected line range (@filename#L1-10) into the message prompt. - Tagged files will be automatically sent as context to the active agent.
2. File Tags @ Smart Completion
Tag files in your prompt to give the agent precise project context. Typing @ in the chat input instantly opens a completion popup with multi-level directory drilling:
- 📁 Subdirectories & cascading navigation — selecting a folder (e.g.
src/) automatically cascades into its subdirectories and files without re-typing@ - 📄 Workspace files — files in the active workspace root
- 📦 Multi-root workspaces — drill into secondary workspace folders
- 📂 Open files — files currently open in editor tabs
A tag can point at a file (@src/main.py), a line or range (@src/main.py#L42, @src/main.py#L10-25), or a directory (@src/). Tagged files are sent to the agent as context along with your message. Chat with Agent and the sidebar context menu can also insert tags for you.
3. Set Working Directory
Right-click on any folder in the sidebar and select Set Working Directory to choose the agent's primary working directory (cwd). This is the default directory used when the agent runs commands or accesses relative paths. You can also use TermMate: Set Working Directory from the command palette.
For sublime projects with multi-folder open in the same workspace, TermMate keeps the selected folder as the cwd and gives the agent access to the other folders as additional directories. This is equivalent to agent's add-dir option.
4. Quick Message
Run TermMate: Quick Message from the command palette to compose and send a message directly from the current tab. If text is selected, TermMate automatically includes its file and line range as context. The message is sent to the existing chat, or a new chat is started if needed.
5. Split Chat Window
You can use the command palette (TermMate: Split Chat Window) or right-click the chat view tab and select TermMate: Split Chat Window to split the editor layout and place the chat view into its own dedicated pane. By default, this pane is isolated so opening other files will not overwrite the chat view. This isolation behavior can be configured via the dedicated_chat_pane setting.
Agent Modes & Controls
Plan Mode
Switch between two execution styles from the Command Palette: TermMate: Plan Mode
| Mode | Behavior |
|---|---|
| Fast (default) | Agent acts immediately — no intermediate steps shown. |
| Planning | Agent outlines a step-by-step plan before doing anything. Useful for large or risky changes. |
Approve Mode
Control how much the agent can do without asking you first: TermMate: Approve Mode
| Mode | Behavior |
|---|---|
| Default | Prompts you before every tool action. |
| Allow Edit | Auto-approves safe read/edit operations; still prompts for shell commands. |
| Accept All | Auto-approves everything, including shell execution. Maximum autonomy. |
Switch Agent
Use TermMate: Switch Agent to swap between Claude, Codex, Antigravity, OpenCode, and Pi Agent at any time.
Select Model
Use TermMate: Select Model to pick a specific LLM model per agent (e.g. claude-opus-4-5 vs claude-sonnet-4-5). For models supporting thinking or reasoning, TermMate will prompt you to select the effort level (or adjust it via TermMate: Reasoning Effort).
Artifacts
TermMate artifact panel tracks generated files, diffs, and structured documents produced by agents, presenting them as interactive artifacts right inside the chat view.
1. File Changes Artifacts
When an agent creates or modifies files, TermMate displays a summary of affected files along with line addition and deletion:
▣ 2 files changed
    src/foo.py  +12 -3
    src/bar.py  +5 -1
Double-Click a file entry to jump directly to the file and review the unified diff in the editor. Artifacts are folded by default. Click the ▶ arrow in the gutter to expand and view the full diff inline.
2. Plan & Walkthrough Artifacts (Antigravity)
For Google Antigravity, planning documents and execution summaries are tracked as persistent artifacts:
- Plan (
implementation_plan.md): Step-by-step implementation plan. In Plan Mode, click the[Implement Plan]button in chat to approve and start execution. - Walkthrough (
walkthrough.md): Post-task summary of modified files and verification results.
Double-Click any artifact link in chat to open it in Sublime Text. Documents are preserved in the session directory (~/.gemini/antigravity-cli/brain/).
Session Management: Clear, Resume & Rewind
1. Clear Session
To reset the current conversation history and start a completely fresh context, open the command palette and run TermMate: Clear Session. This will reload the agent and clear its memory for the current workspace.
2. Resume Previous Conversation
Run TermMate: Resume Session from the command palette to continue a past conversation. A quick panel lists previous sessions for the current workspace, each showing a short summary and timestamp. Select one and the agent picks up exactly where it left off.
3. Rewind Conversation
Hover over any gutter dot or click the ↩ button that appears at the prompt line to rewind the conversation to that point. A confirmation panel lets you confirm or cancel before the rewind takes effect.
When confirmed, TermMate forks the session at the selected prompt, removes all subsequent messages from the chat view - letting you explore a different direction without losing the original context.
Shortcuts & Commands
| Action | macOS | Windows/Linux | Command Palette |
|---|---|---|---|
| Install Agent | - | - | TermMate: Install Agent |
| Start New Chat | - | - | TermMate: Start Chat |
| Quick Message | - | - | TermMate: Quick Message |
| Split Chat Window | - | - | TermMate: Split Chat Window |
| Send Message | Cmd+Enter |
Ctrl+Enter |
- |
| Stop Conversation | Cmd+Escape |
Shift+Escape |
TermMate: Stop Conversation |
| Navigate Input History | Up / Down |
Up / Down |
- |
| Mention File | @ |
@ |
- |
| Set Workspace | - | - | TermMate: Set Working Directory |
| Switch Agent | - | - | TermMate: Switch Agent |
| Select Model | - | - | TermMate: Select Model |
| Plan Mode | - | - | TermMate: Plan Mode |
| Approve Mode | - | - | TermMate: Approve Mode |
| Reasoning Effort | - | - | TermMate: Reasoning Effort |
Configuration
Customize TermMate by editing your settings: Preferences -> Package Settings -> TermMate -> Settings
Agent CLI Paths
While TermMate automatically detects most agent CLI installation paths, you may need to configure them manually if:
- You use a custom installation location not listed in the default paths.
- You have multiple versions installed and want to pin a specific binary.
- Automatic detection fails on your specific OS configuration.
{
    "claude_command": "/path/to/your/custom/claude",
    "codex_command": "/path/to/your/custom/codex",
    "opencode_command": "/path/to/your/custom/opencode",
    "pi_command": "/path/to/your/custom/pi",
    "antigravity_command": "/path/to/your/custom/agy"
}
Custom Environment Variables
The env configuration allows you to inject custom environment variables directly into the process when starting an agent CLI command. This is useful for providing API keys, custom base URLs, or passing specific environment values without altering your global system configuration.
Example: OpenRouter for Claude
Set a custom base URL and auth token so Claude routes through OpenRouter (ANTHROPIC_API_KEY must be empty in this case):
{
    "env": {
        "ANTHROPIC_BASE_URL": "https://openrouter.ai/api/v1",
        "ANTHROPIC_AUTH_TOKEN": "sk-openrouter-token",
        "ANTHROPIC_API_KEY": ""
    }
}
Example: Azure AI Foundry for Codex
model_provider = "azure"

[model_providers.azure]
name = "Azure OpenAI"
base_url = "https://YOUR_RESOURCE_NAME.services.ai.azure.com/openai/v1"
env_key = "AZURE_OPENAI_API_KEY"
wire_api = "responses"
Replace YOUR_RESOURCE_NAME with your Azure Foundry resource and add the configuration above to ~/.codex/config.toml, then set AZURE_OPENAI_API_KEY in TermMate settings:
{
    "env": {
        "AZURE_OPENAI_API_KEY": "your-api-key"
    }
}
Example: Gemini API key for OpenCode
OpenCode uses the GOOGLE_GENERATIVE_AI_API_KEY environment variable. Set it here to authenticate without modifying your system environment (you may need to remove existing local auth.json via delete ~/.local/share/opencode/auth.json first):
{
    "env": {
        "GOOGLE_GENERATIVE_AI_API_KEY": "your-gemini-api-key"
    }
}
Custom Keybindings
By default, TermMate does not register a shortcut for TermMate: Start Chat to avoid conflicts. You can manually add a shortcut (Cmd+Option+G on macOS, Ctrl+Alt+G on Windows/Linux) by navigating to Preferences -> Key Bindings and adding the following configuration:
[
    {
        "keys": ["primary+alt+g"],
        "command": "term_chat_cli",
        "args": {},
        "context":
        [
            { "key": "setting.is_widget", "operand": false }
        ]
    }
]
To add the current file location or selected lines to Chat with Agent, configure Cmd+Option+K on macOS or Ctrl+Alt+K on Windows/Linux:
[
    {
        "keys": ["primary+alt+k"],
        "command": "term_chat_add_context",
        "context":
        [
            { "key": "setting.is_widget", "operand": false }
        ]
    }
]
Additional Settings
These settings can be added or changed in Preferences → Package Settings → TermMate → Settings:
| Setting | Description | Values / default |
|---|---|---|
table_style |
Controls how Markdown tables are rendered in the Chat | "bordered", "markdown", or "html"; default: "html" |
diff_fold_limit |
Automatically folds a diff when it contains more than this many diff lines | default: 200 (to show complete diff much as possible); set to 0 to keep all diffs expanded |
dedicated_chat_pane |
Keeps the Chat tab in a dedicated pane so files opened elsewhere do not replace it. | true or false; default: true |
show_status_indicator |
Whether to display model indicator claude(sonnet) in status bar |
true or false; default: true |
💡 TermMate Agent Tips
- Selection as Context: Select code before starting a chat to focus the agent's attention on specific logic.
- Iterative Refinement: Use Planning Mode for large architectural changes to see the agent's proposed steps before they are applied.
- Reviewing Changes with Sourcetree and Sublime Merge: Use dedicated Git GUIs like Sourcetree or Sublime Merge to review file diffs after the agent makes edits. Instead of manually accepting or rejecting changes line by line, simply tell the agent what to adjust and let it refine the diff.
Privacy & Data Handling
TermMate does not send your entire workspace or file contents to any external servers.
Your data will only be sent to the respective LLM services used by Claude Code, Codex, OpenCode, or Pi under the following specific conditions:
What data is sent:
- Any text you manually type into the TermMate ChatView.
- The contents of specific files you explicitly tag using the
@filenamesyntax. - The outputs of shell commands, directory listings, or file contents that the agent explicitly requests to read.
How TermMate interacts with Agents:
- Local Execution: The core plugin logic runs entirely on your local machine. All communication happens locally via the official CLI tools (
claude,codex, orpi) installed on your system. - No Data Collection: TermMate does not collect, store, or transmit any of your source code or usage telemetry to our servers. TermMate does not send data to any third-party middleman servers; data goes directly to Anthropic or OpenAI using your own configured authentication credentials.
- Data is only sent when you actively hit command+enter(or ctrl+enter) in the ChatView, or when the agent executes a tool (if you have granted permission via your
Approve Modesettings).
License
TermMate is provided under the Apache License, Version 2.0 with the Commons Clause condition.
This means it's free to use, modify, and redistribute the code for personal or internal use. However, commercial resale or providing a paid service is strictly prohibited.
For complete details, please see the LICENSE file.