gcode
gcode (g-code) syntax highlighting for the Sublime Text editor; useful for viewing or editing CNC or 3D printer gcode files
Details
Installs
- Total 11K
- Win 7K
- Mac 3K
- Linux 2K
| Jul 21 | Jul 20 | Jul 19 | Jul 18 | Jul 17 | Jul 16 | Jul 15 | Jul 14 | Jul 13 | Jul 12 | Jul 11 | Jul 10 | Jul 9 | Jul 8 | Jul 7 | Jul 6 | Jul 5 | Jul 4 | Jul 3 | Jul 2 | Jul 1 | Jun 30 | Jun 29 | Jun 28 | Jun 27 | Jun 26 | Jun 25 | Jun 24 | Jun 23 | Jun 22 | Jun 21 | Jun 20 | Jun 19 | Jun 18 | Jun 17 | Jun 16 | Jun 15 | Jun 14 | Jun 13 | Jun 12 | Jun 11 | Jun 10 | Jun 9 | Jun 8 | Jun 7 | Jun 6 | |
|---|---|---|---|---|---|---|---|---|---|---|---|---|---|---|---|---|---|---|---|---|---|---|---|---|---|---|---|---|---|---|---|---|---|---|---|---|---|---|---|---|---|---|---|---|---|---|
| Windows | 0 | 1 | 1 | 1 | 0 | 1 | 0 | 1 | 1 | 0 | 0 | 1 | 1 | 0 | 3 | 2 | 0 | 0 | 2 | 0 | 1 | 0 | 0 | 0 | 1 | 1 | 1 | 1 | 1 | 0 | 0 | 0 | 1 | 1 | 0 | 2 | 0 | 0 | 0 | 4 | 1 | 0 | 2 | 1 | 1 | 0 |
| Mac | 0 | 0 | 1 | 0 | 0 | 0 | 1 | 0 | 0 | 0 | 0 | 0 | 0 | 0 | 1 | 0 | 0 | 1 | 0 | 0 | 0 | 0 | 0 | 0 | 0 | 0 | 0 | 1 | 0 | 0 | 0 | 0 | 0 | 0 | 0 | 1 | 0 | 0 | 0 | 0 | 0 | 0 | 0 | 1 | 0 | 1 |
| Linux | 0 | 0 | 0 | 0 | 0 | 0 | 0 | 0 | 0 | 0 | 0 | 0 | 3 | 0 | 1 | 0 | 0 | 0 | 0 | 0 | 0 | 0 | 0 | 0 | 0 | 0 | 0 | 1 | 1 | 0 | 0 | 0 | 0 | 0 | 0 | 1 | 0 | 1 | 1 | 0 | 1 | 0 | 0 | 0 | 0 | 0 |
Readme
- Source
- raw.githubusercontent.com
Gabriel Staples
Table of Contents
(click to expand)
- sublime_gcode
- Installation
- Issues
- Developer Notes & Package Development Tutorial
- References:
- Sublime Text packages and syntax highlighting–how it all works
- 1. Sublime Text packages
- 2. Syntax highlighting
- Multiple syntax highlighting definitions in one package
- _
scope–> Color Scheme mapping:_ How do syntax highlightingscopevalues map to actual syntax highlighting colors and formats? - To check the syntax highlighting scope of a particular place in a source code file…
- Choosing scopes with desired color and formatting
- To modify and test changes to this package locally…
sublime_gcode
Status: done! It works!
This is the PR that got this package into Sublime Package Control: https://github.com/wbond/package_control_channel/pull/8501.
Here is this package on the Package Control website: https://packagecontrol.io/packages/gcode. As of its release into Package Control on 7 Apr. 2022, the existing number of downloads for the package were actually all for the package this one replaces, named gcode-syntax-highlighting, by @themachinist. The existing number of downloads for that older package were (hover over the numbers on the package control website above to see them): 1. Total: 8453 2. Windows: 5113 3. Mac: 2107 4. Linux: 1233
Therefore, only numbers beyond these counts are the number of downloads of this new gcode package provided by this repo.
Description
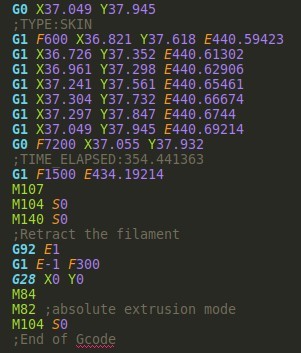
gcode (g-code) syntax highlighting for the Sublime Text editor; useful for viewing or editing CNC or 3D printer gcode files, including those from the Ultimaker Cura slicer, PrusaSlicer, or Slic3r, for instance.
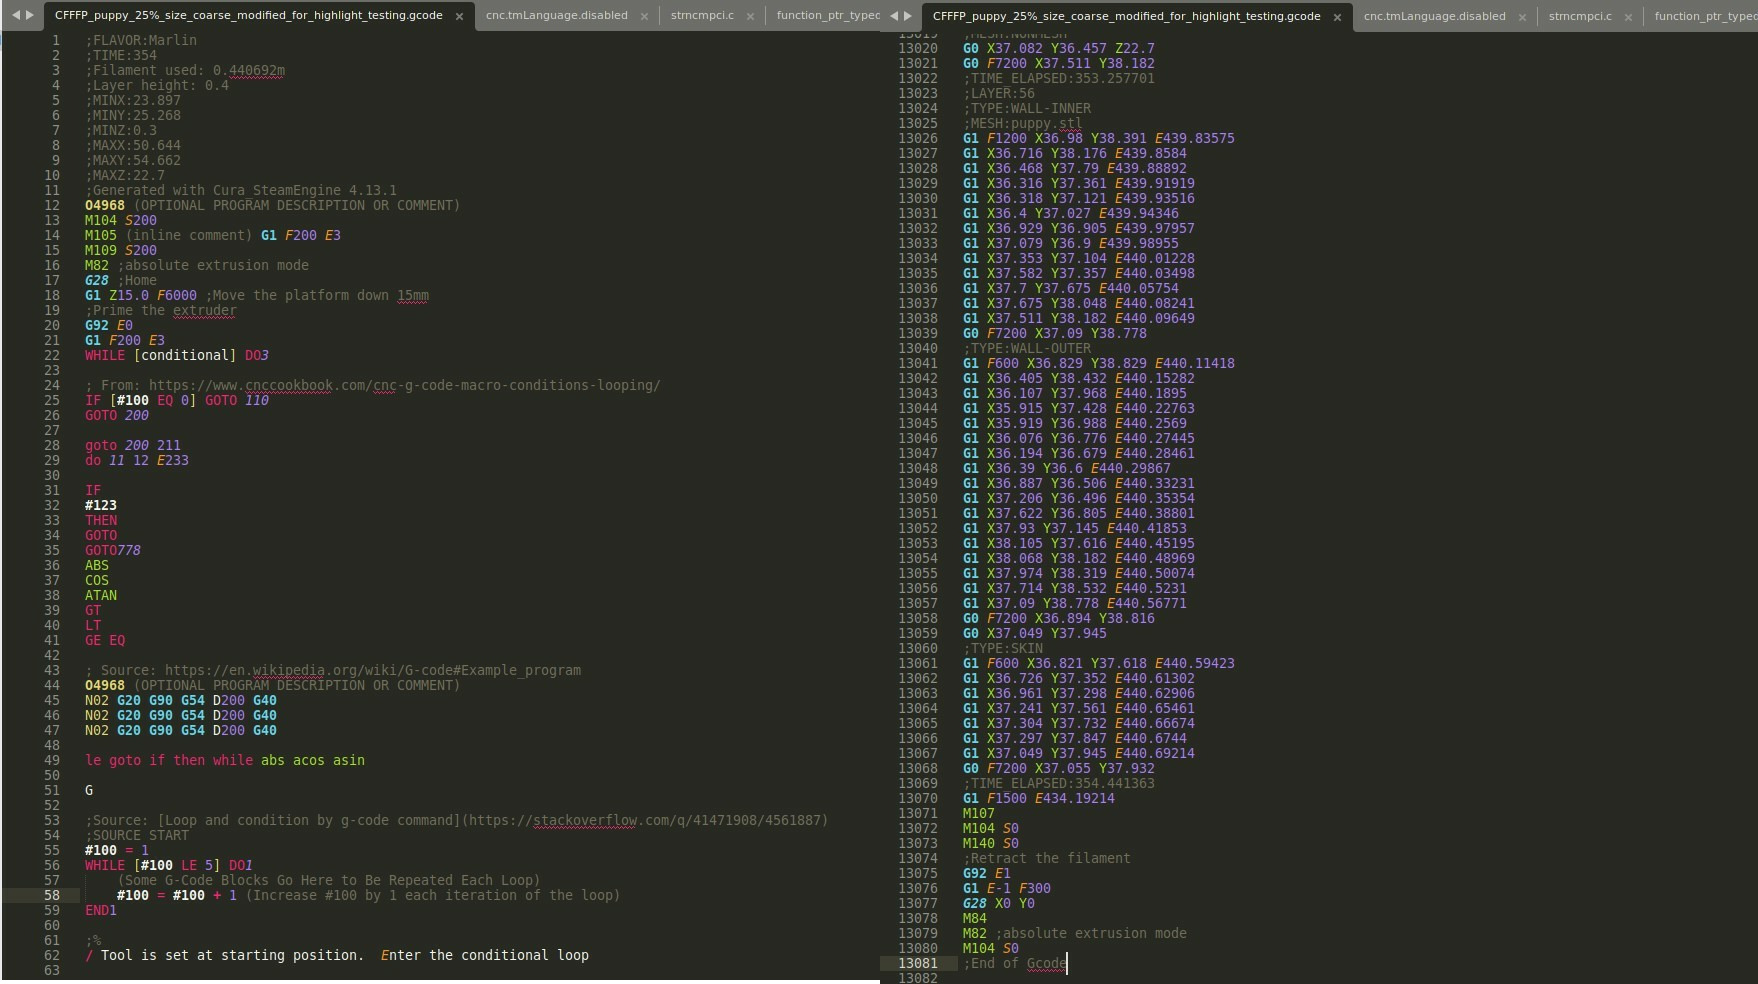
Screenshots of Sublime Text 4 with Color Scheme Monokai and gcode syntax highlighter:
G-code formats, “flavors”, and standards:
This should be able to handle and highlight a variety of gcode formats and styles, including the following. If you have any problems, screenshot the syntax highlighting you see, open a new Issue, paste the screenshot and a large chunk of the gcode for me to play with and test, and links to any documentation pertaining to this flavor of gcode syntax, and explain what formatting or highlighting you would have expected to see. The main reference for the following list is this: https://en.wikipedia.org/wiki/G-code.
Standards:
- RS-274
- ISO 6983
- DIN 66025
- PN-73M-55256 and PN-93/M-55251
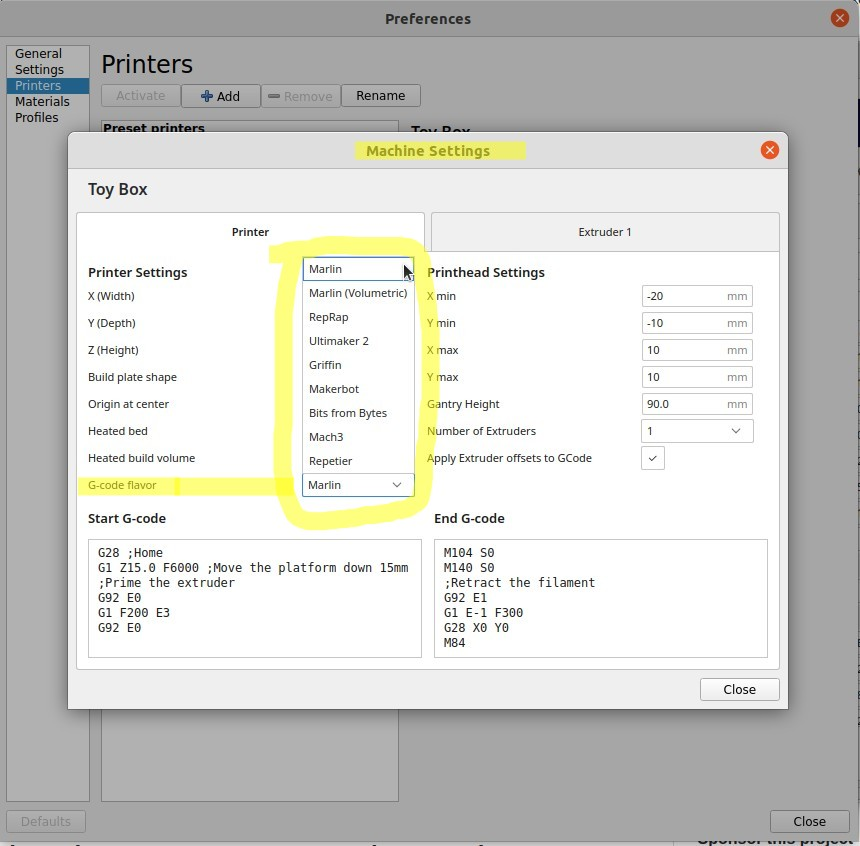
G-code “Flavors”
(As shown from the drop-down menu for the Machine Settings in the Cura 3D printer slicer software)):
- Marlin
- Marlin (Volumetric)
- RepRap
- Ultimaker 2
- Griffin
- Makerbot
- Bits from Bytes
- Mach3
- Repetier
Inspired by these two projects:
- gcode-syntax-highlighting, by @themachinist.
- my fork of it: https://github.com/ElectricRCAircraftGuy/gcode-syntax-highlighting
- The
gcodesyntax in my project is strongly influenced by @themachinist's work above. I used his work as an example and starting point as I wrote and modified the regular expressionmatchpatterns andscopes. My work differs significantly enough, however, that I decided to make my repo from scratch rather than making it a fork of his repo.
- The zip file version by @digex, here.
- See my full installation instructions and notes on it here.
- The
gcode-alternatesyntax in my project is an exact copy of @digex's work in the zip file above.
Installation
1. Package Control
Open the Command Palette via Tools –> Command Palette..., or by pressing Ctrl + Shift + P. Then, search for install package, and click on Package Control: Install Package. Search for “gcode”, and install the package by that name. gcode is now available as one of the syntax highlighting options.
If you ever want to remove it, use Ctrl + Shift + P and then search for Package Control: Remove Package. Select it, and then search for gcode.
To list all installed packages, use Ctrl + Shift + P and then Package Control: List Packages.
2. Manual installation
In Sublime Text, find the path to your Packages folder by clicking Preferences –> Browse Packages.... This will open up your GUI file manager to the path where Sublime Text packages are stored. For me on Linux Ubuntu 20.04, that's /home/gabriel/.config/sublime-text-3/Packages (even though I am running Sublime Text 4).
Now, extract this package to that folder.
Option 1: the GUI way: click the green “Code” button above –> “Download ZIP” –> save the zip file, extract it to your Packages path above, and rename it to gcode.
OR Option 2 [what I prefer]: the command-line way:
# --------------
# Option 2.A: clone the repo directly into your "Packages" dir
# --------------

# cd to the Packages dir (change this path according to your Packages path above)
cd "$HOME/.config/sublime-text-3/Packages"
# clone the repo
git clone https://github.com/ElectricRCAircraftGuy/sublime_gcode.git
# rename the repo dir to "gcode"
mv sublime_gcode gcode

# --------------
# OR Option 2.B [what I prefer]: clone the repo into wherever you want, and then
# symlink it into your "Packages" dir
# --------------

# clone repo into ~/dev
mkdir -p ~/dev
cd ~/dev
git clone https://github.com/ElectricRCAircraftGuy/sublime_gcode.git
# now symlink it into your Packages dir
ln -si ~/dev/sublime_gcode ~/.config/sublime-text-3/Packages/gcode
That's it! The gcode entry is now instantly available in your syntax highlighting menu.
Issues
If anything doesn't work or look as expected with the the main gcode syntax highlighter, please open up an issue in this GitHub repo and I'll address it. That includes text that should be highlighted, but isn't, missing gcode file extensions, etc.
Developer Notes & Package Development Tutorial
If you are a regular user, you can stop here. These notes are for myself, and for other developers who want to learn how to make new Sublime Text packages, including syntax highlighting packages, or who want to edit the syntax highlighting of this or other packages, or who want to learn what I learned in order to contribute to this repo.
Tested in Sublime Text 4 (build 4126) on Linux Ubuntu 20.04.
References:
- A ton of independent testing and experimenting on my own
- https://en.wikipedia.org/wiki/G-code
.tmLanguageand.YAML-tmLanguagefiles are apparently some sort of ubiquitous TextMate-inspired language grammar files used for specifying syntax highlighting rules.- Marlin g-code (for 3D printers) official reference pages: https://marlinfw.org/meta/gcode/
- Sublime Text pages:
- Syntax Definitions: https://www.sublimetext.com/docs/syntax.html - explains how
.sublime-syntaxfiles are built and work.
- Syntax Definitions: https://www.sublimetext.com/docs/syntax.html - explains how
- Package Control:
- *****Customizing Packages: https://packagecontrol.io/docs/customizing_packages
- *****Submitting a [new] Package: https://packagecontrol.io/docs/submitting_a_package
- *****TextMate language grammars documentation: https://macromates.com/manual/en/language_grammars; ex:
support.variable,comment.line,markup.bold,support.function, etc.
- http://ilkinulas.github.io/programming/2016/02/05/sublime-text-syntax-highlighting.html - showed me that editing Monokai.tmTheme with your scope names and formatting is how you modify formatting for your custom syntax highlighting scopes.
- NB: I later discovered on my own that I should NOT modify the Monokai color theme directly (since it now comes in a compressed location anyway, which location is intended NOT to be modified directly–see my answer here and this comment here), but rather I should go to
Preferences–>Customize Color Schemeand then edit the user settings in the right-hand side of the JSON file that comes by adding new dictionary entries for custom formatting under theruleslist of dicts.
- NB: I later discovered on my own that I should NOT modify the Monokai color theme directly (since it now comes in a compressed location anyway, which location is intended NOT to be modified directly–see my answer here and this comment here), but rather I should go to
- https://github.com/va9iff/SublimeNotePad - incredibly simple example of a package plugin in Sublime Text, with Python code to interact with the Sublime Text GUI and menus and things! See its request to be added to Package Control here: https://github.com/wbond/package_control_channel/pull/8481.
- *****Scope namespacing (my comments about it) for syntax highlighters in Sublime Text: https://github.com/wbond/package_control_channel/pull/8454#issuecomment-1073181257
- See my full installation instructions and notes on the gcode syntax highlighting by @digex here.
- https://regex101.com/ - use this tool to build, check, and test your regular expressions to be used as syntax highlighting matching patterns.
Sublime Text packages and syntax highlighting–how it all works
1. Sublime Text packages
Any folder inside of your Sublime Text Packages folder (found via Preferences –> Browse Packages...) is automatically instantly loaded by Sublime Text as a “package”.
Packages installed by the Package Control package, however, come in two types:
1. Packed: most packages installed by Package Control are “packed” into a zip file named packageName.sublime-package and are located inside the Installed Packages dir which is at the same level as the Packages dir.
1. If you manually create a dir inside the Packages dir and name it packageName (to match the packed file above), then any files in it with the same name as those in the packed package will override those in the packed package. See the “Overrides” section here: https://packagecontrol.io/docs/customizing_packages.
1. Unpacked: any package which is installed in the Packages dir is unpacked.
1. Developers can tell Package Control to unpack a package installed by Package Control by placing a file named .no-sublime-package at the root of their repo. See here: https://packagecontrol.io/docs/submitting_a_package.
1. Unpacked packages are required if they contain binary executables which need to be run by the system, for instance, as they apparently can't run from inside the packed zip file.
2. Syntax highlighting
Syntax highlighting packages must contain a *.tmLanguage XML-format Textmate syntax highlighting definition file, OR a *.sublime-syntax YAML-format file. My personal testing shows that if you have both types of files with the same syntax highlighting name value specified inside of them, then the *.sublime-syntax file takes precedence and is what Sublime Text uses. Note that Textmate files also come in a YAML-format variety named *.YAML-tmLanguage, but apparently (per my testing) this file does nothing for Sublime Text and is not recognized by Sublime Text.
Note also that the name of the *.tmLanguage or *.sublime-syntax file doesn't matter! The name field specified inside that file is what matters! So, if you have a file named whatever.sublime-syntax, and it contains a name field inside of it set to gcode, then what you will see in the syntax highlighting selection menu is gcode.
To have Sublime Text auto-convert a Textmate .tmLanguage file into a .sublime-syntax file for you, open up the .tmLanguage file in Sublime Text, then go to Tools –> Developer –> "New Syntax from *.tmLanguage...". A file named *.sublime-syntax will be created and opened in Sublime Text, but you'll need to manually choose to save it somewhere if you want to keep it. This auto-conversion doesn't always work, however, and I can't pinpoint why it doesn't do anything sometimes. You can also go to Tools –> Developer –> New Syntax... to create a generic example .sublime-syntax file.
I recommend you use .sublime-syntax files to specify syntax highlighting. You can read official Sublime Text documentation about them here: https://www.sublimetext.com/docs/syntax.html.
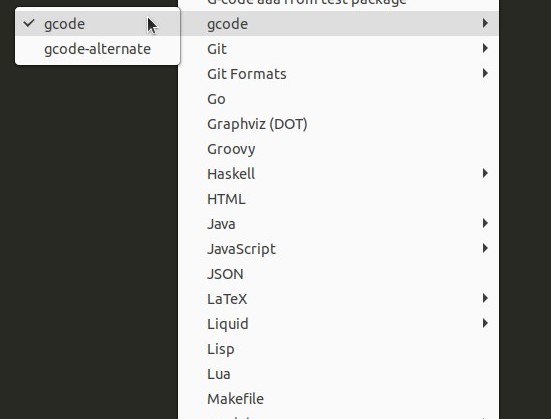
Multiple syntax highlighting definitions in one package
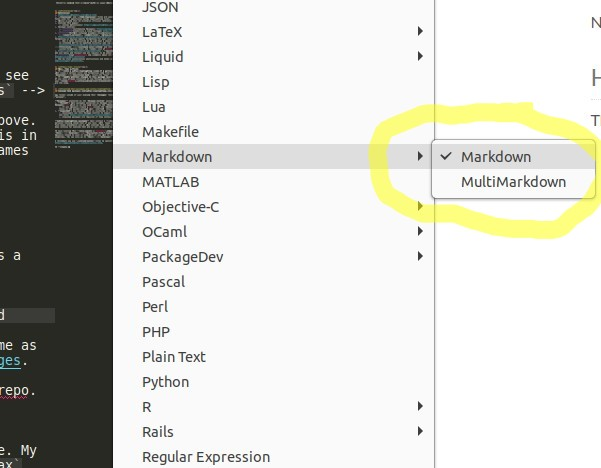
If a single package contains only one syntax highlighting definition file (of the file format *.tmLanguage or *.sublime-syntax), then the name value inside that file is what will show up in your syntax highlighting menus (again, the filename itself doesn't matter). However, if you place multiple syntax highlighting definition files inside the same package, then the syntax highlighting menu will place the package directory name in the menu, with a little black arrow to the right of it, and if you hover on this menu entry it will expand to show the name field values of each file in the package. Example: this menu entry would be generated by a package directory named Markdown, containing two syntax highlighting definition files, one with its name field set to Markdown and the other with its name field set to MultiMarkdown:
To temporarily disable a syntax highlighting definition file, simply rename it so it no longer has the .tmLanguage or .sublime-syntax extension. I like to just add .disabled to the very end to make it clear what I am doing. Example: rename whatever.sublime-syntax to whatever.sublime-syntax.disabled.
_scope –> Color Scheme mapping:_ How do syntax highlighting scope values map to actual syntax highlighting colors and formats?
The highest-level scope entry in a .sublime-syntax file can be anything you want. It appears to have no bearing on the mapping to the formatting or colors. So, gcode below can be anything.
The scope entries which are associated with match regex expressions, however are important! They must match entries for your color theme!
Consider this example.sublime-syntax file:
%YAML 1.2
---
# http://www.sublimetext.com/docs/syntax.html
# GS: https://macromates.com/manual/en/language_grammars
name: gcode
file_extensions:
  - eia
  - nc
  - ngc
  - prg
  - mpf
  - gcode
scope: source.iso6983
contexts:
  main:
    - match: G\d+
      comment: g commands
      scope: support.function
    - match: M\d+
      comment: m commands
      scope: support.constant
The gcode name entry can be anything. The support.constant scope name, however, must match a scope entry in your color scheme file in order for it to receive any formatting!
In Sublime Text, go to Preferences –> Customize Color Scheme to see your color theme. Mine is set to Monokai, so it opens up this Sublime Text Color Scheme JSON file:
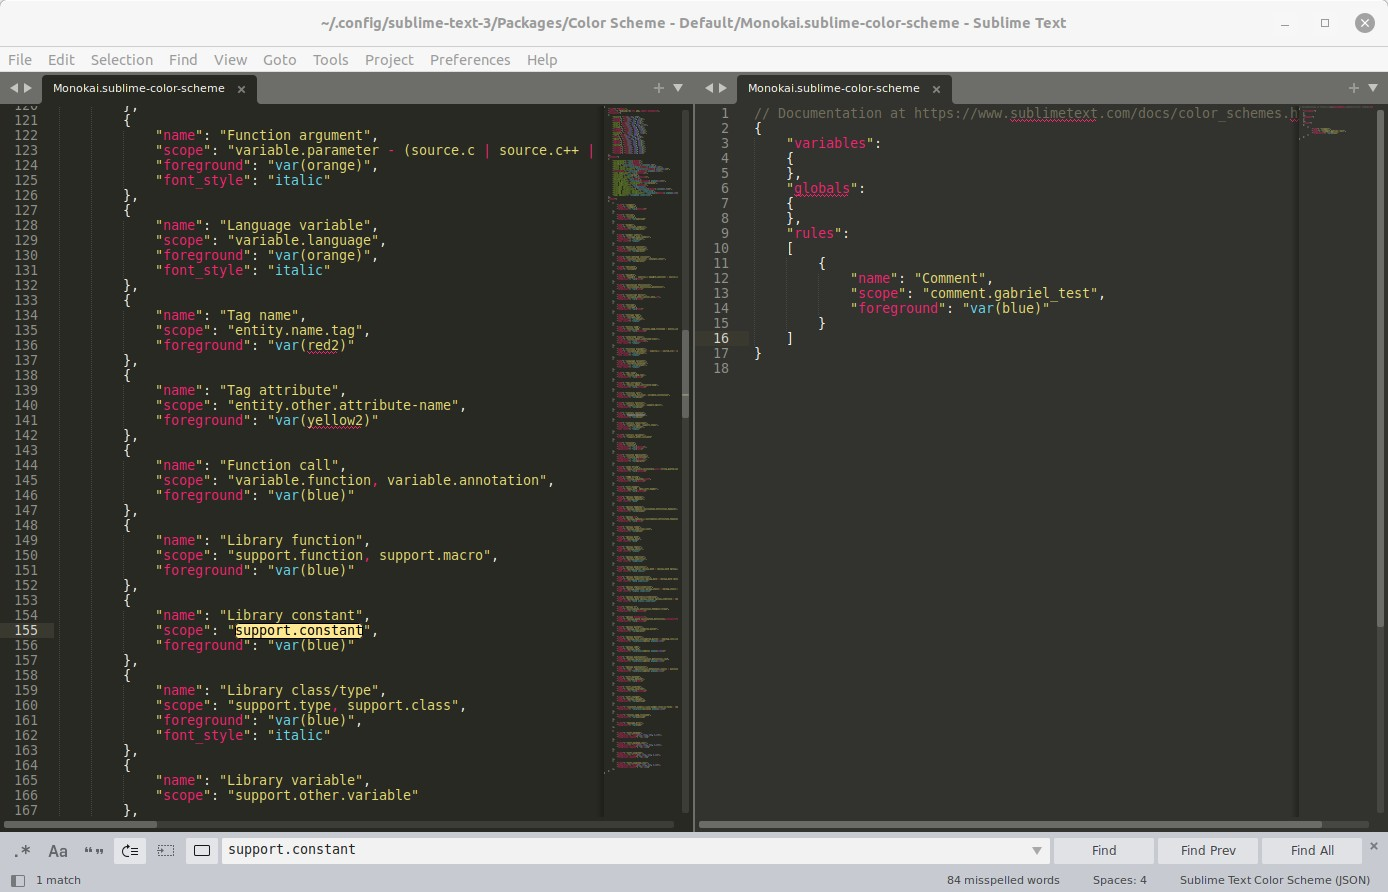
The left side contains all default definitions and values. You can't edit this. The right side contains your custom overrides and additions. You can edit this. In the left-hand side you can see I have searched for support.constant, and it is set to "var(blue)" color. blue is defined in a variables list at the top of this JSON file, as this: "blue": "hsl(190, 81%, 67%)",. So, the syntax definition file above says that if any string in a source file matches regular expression M\d+, then it will be assigned the scope name support.constant, and my Monokai color scheme has a definition for the scope support.constant which formats its foreground as blue! That's how this mapping works!
scope hierarchy
If my color scheme JSON file does NOT have any scope entry for support.constant, then it will go up one level in the scope namespace and look for an entry for support. If a support scope entry exists, then my support.constant will receive the formatting from the support scope. If no entry for scope support exists, then the text assigned to scope support.constant will get no special formatting applied. If that is the case, then you can either 1. change the scope name in the syntax highlighting definition file, or 2. add an entry to the user-side (right-hand side) of your color scheme in Preferences –> Customize Color Scheme.
Choosing scope names for your syntax definition file
TextMate describes recommended scope naming conventions in section “12.4 Naming Conventions” of their manual here: https://macromates.com/manual/en/language_grammars. Sub-bullets should be scoped with a dot (.), so when you see this in the document:
- comment
- line
- block
…it means that you can have a scope named comment, comment.line, or comment.block. For the support scope, you'll see:
- support
- function
- class
- type
- constant
etc.
It is a good idea to use the naming conventions established by TextMate as a starting point, as they seem to be a sort of “industry standard”. However, what matters even more are the scope names in your color scheme file, so ensure whatever scope names you use, they are in your color scheme file (Preferences –> Customize Color Scheme), as that's even more important! Choosing scope names from your color scheme file is the best thing to do.
See the section below titled “Choosing scopes with desired color and formatting” for more tips and techniques.
Adding a unique subscope
In the example above, using a scope of support.constant works because that scope has a definition inside my color scheme. However, it is recommended to add a unique subscope to the end of this! By common convention, you should use the name value of this entire syntax highlighting definition file as the subscope, and therefore add .gcode to the end of all of your scopes to make them unique. This results in the following changes: support.function changes to support.function.gcode, and support.constant changes to support.constant.gcode.
The advantage of this is now users of your syntax highlighting package, and other package maintainers, can customize colors and formatting to affect just scopes for your package, if they so wish. They can override the support.constant.gcode scope in their user settings for the color scheme with this rule, for instance:
// Documentation at https://www.sublimetext.com/docs/color_schemes.html
{
    "variables":
    {
    },
    "globals":
    {
    },
    "rules":
    [
        {
            "name": "gcode Library constant",
            "scope": "support.constant.gcode",
            "foreground": "var(grey)"
        }
    ]
}
If they do not override this scope, however, there is no problem! Scope support.constant.gcode may have no matching scope entry in the color scheme, but support.constant will, so the default support.constant formatting will be applied to your support.constant.gcode scope!
For an additional explanation of and example of this concept above, see my comment on this PR here.
To check the syntax highlighting scope of a particular place in a source code file…
…in order to check to see if your syntax highlighting is working, or to see what scope a certain color and formatting come from for a syntax highlighting you like, place your cursor in the code where you want to check, then go to Tools –> Developer –> Show Scope Name. Click the “Copy” link in the little box that pops up over the source code if you'd like to copy that scope name.
Choosing scopes with desired color and formatting
Read the sections just above first, to get full context on what I'm doing here, and why/how it works.
Once you are ready to choose desired colors and formatting for a new syntax and file type, the trick I like to do to find the right scope for the job (ie: formatting that I like and that makes sense) is this:
- Ensure you have your desired color scheme activated in Sublime Text:
Preferences–>Select Color Scheme...–> choose a color scheme. I really likeMonokaithe best, which was the default in Sublime Text 3. I still use it in Sublime Text 4. - Open up a file type you are very familiar with in this color scheme, such as a
.cC source file. - Find a color and format you like and which makes sense for the job. Ex: in gcode files,
GandMcommands are essentially functions, so, in a C source file I'd find a function call, such asprintf(), which has the formatting I want for aGcommand, and I'd put my cursor on it. Go to
Tools–>Developer–>Show Scope Nameto see the scope. This is the scope for a Cprintf()function call (not definition): “ source.c++ meta.function.c++ meta.block.c++ meta.function-call.c++ support.function.C99.cThe part I care about is the end scope, which is
support.function.C99.c. As described in the "Adding a unique subscope” section above, the.C99.csubscope parts don't matter here to me. So, strip them off. That leaves us with thesupport.functionscope.Open up your color scheme via
Preferences–>Customize Color Schemein order to search the color scheme for this scope to ensure it exists there. In the left-hand pane, I search forsupport.function. I find this entry: “jsonc { "name”: “Library function”, “scope”: “support.function, support.macro”, “foreground”: “var(blue)” },Notice the `foreground": "var(blue)"` formatting! That's where this scope for the C `printf()` function gets its formatting! If I like that formatting and want it for `G` commands in `gcode` files, I'll use the `support.function` scope for those `G` commands as well, giving it a unique subscope to ultimately be this scope: `support.function.gcode`.
Done! That's one way to find and set a desired scope.
Going further: function definitions, not calls, in C, have this scope: “ source.c++ meta.function.c++ meta.toc-list.full-identifier.c++ entity.name.function.c++
The scope part I care about is at the far right: `entity.name.function.c++`. Strip off the `.c++` and I get `entity.name.function`. I search for that in the color scheme as described above, and it doesn't exist. _But_, `entity.name` _does_ exist! That means this is the scope which sets the formatting in this case. This entry in the color scheme file for Monokai is:
```jsonc
{
    "name": "Entity name",
    "scope": "entity.name - (entity.name.filename | entity.name.section | entity.name.tag | entity.name.label)",
    "foreground": "var(yellow2)"
},
The
entity.name - (...)part means: "apply this formatting to theentity.namescope, and all its subscopes except for these in the list we are subtracting off.” You can see the formatting is setting theforegroundtovar(yellow2). To be sure of this, copy and paste that block to the right-hand pane and change that tovar(blue)and ensure the color for your function definitions in C instantly changes. Yep! It sure does! (I just tested this). So, that means I did indeed find the right scope! Anyway, if I like this scope format for something else in mygcodesyntax highlighting, I'll use scopeentity.name.gcodeas my unique scope to map to this formatting!Don't forget to delete the customization you just made in the right-hand pane when done.
To modify and test changes to this package locally…
…in case you'd like to change it or contribute to it, follow the “manual installation” instructions above. If you have already installed it via Package Control, then what is in your /home/$USERNAME/.config/sublime-text-3/Packages/gcode folder will override what is in your /home/$USERNAME/.config/sublime-text-3/Installed Packages/gcode.sublime-package zip file which Package Control installed, so long as the folder and file names are the same.
Modify any files in the Packages/gcode dir as desired. Each time you save, the changes will instantly be reflected in all Sublime Text editors you have open. As a quick test:
1. Open a gcode file.
1. Click your cursor on some text in the file.
1. Use the Tools –> Developer –> Show Scope Name trick to see what the scope is for that text.
1. Open the corresponding *.sublime-syntax file.
1. Change or delete the regular expression in the match entry for that corresponding scope you just found, so that it no longer matches the text on which you placed your cursor.
1. Save the *.sublime-syntax file and you will instantly see the formatting of that text in the gcode file change.
1. Undo your change to the match entry and save again. The formatting will return to how it was.
1. Go to Preferences –> Customize Color Scheme, and add a custom rules entry for that scope, with new formatting for that scope. Save it and watch the formatting instantly change again. Delete that custom entry when done, if desired.
DONE!
You're now a solid beginner at Sublime Text packages and syntax highlighting, just like me! 😀