MonokaiFree
Monokai Sublime Text color scheme.
Details
Installs
- Total 9K
- Win 5K
- Mac 2K
- Linux 2K
| Jul 14 | Jul 13 | Jul 12 | Jul 11 | Jul 10 | Jul 9 | Jul 8 | Jul 7 | Jul 6 | Jul 5 | Jul 4 | Jul 3 | Jul 2 | Jul 1 | Jun 30 | Jun 29 | Jun 28 | Jun 27 | Jun 26 | Jun 25 | Jun 24 | Jun 23 | Jun 22 | Jun 21 | Jun 20 | Jun 19 | Jun 18 | Jun 17 | Jun 16 | Jun 15 | Jun 14 | Jun 13 | Jun 12 | Jun 11 | Jun 10 | Jun 9 | Jun 8 | Jun 7 | Jun 6 | Jun 5 | Jun 4 | Jun 3 | Jun 2 | Jun 1 | May 31 | |
|---|---|---|---|---|---|---|---|---|---|---|---|---|---|---|---|---|---|---|---|---|---|---|---|---|---|---|---|---|---|---|---|---|---|---|---|---|---|---|---|---|---|---|---|---|---|
| Windows | 2 | 0 | 3 | 0 | 1 | 0 | 0 | 0 | 1 | 0 | 0 | 1 | 1 | 0 | 1 | 1 | 0 | 0 | 0 | 1 | 1 | 1 | 1 | 1 | 0 | 2 | 0 | 1 | 0 | 0 | 1 | 0 | 1 | 0 | 0 | 1 | 1 | 0 | 1 | 1 | 0 | 0 | 1 | 0 | 0 |
| Mac | 0 | 1 | 0 | 1 | 2 | 0 | 0 | 0 | 1 | 0 | 0 | 0 | 1 | 0 | 1 | 1 | 0 | 0 | 4 | 0 | 3 | 0 | 0 | 0 | 1 | 1 | 0 | 1 | 0 | 0 | 1 | 1 | 2 | 0 | 0 | 0 | 0 | 0 | 0 | 1 | 0 | 1 | 2 | 0 | 0 |
| Linux | 0 | 0 | 0 | 0 | 0 | 3 | 1 | 0 | 0 | 1 | 0 | 0 | 0 | 0 | 1 | 0 | 0 | 0 | 0 | 1 | 0 | 0 | 0 | 0 | 0 | 0 | 0 | 0 | 0 | 2 | 0 | 0 | 0 | 0 | 0 | 0 | 1 | 0 | 0 | 0 | 2 | 0 | 0 | 1 | 0 |
Readme
- Source
- raw.githubusercontent.com
Enhanced Monokai Color Scheme for Sublime Text


The Enhanced Monokai color scheme for Sublime Text is a brilliant modification and upgrade of the beloved Monokai color scheme. It's designed to provide a more vibrant and visually pleasing coding experience while preserving the essence of the original Monokai palette and enhancing specific elements for improved readability and code highlighting.
Note: If you've updated from v1 to v2, you may need to reset MonokaiFree as your color scheme. You can do this by navigating to Menu → Preferences → Select Color Scheme → MonokaiFree. For more details, refer to issue #7.
Features
Enhanced syntax highlighting: The Enhanced Monokai color scheme meticulously selects colors for syntax elements, making your code pop and easily distinguishable.
Improved contrast: Optimized color contrast ensures better visibility and reduces eye strain during lengthy coding sessions.
Fine-tuned color choices: Colors are chosen to strike a balance between aesthetics and functionality, creating a harmonious and pleasant coding environment.
Support for multiple languages: The Enhanced Monokai color scheme is suitable for various programming and markup languages, delivering consistent and cohesive syntax highlighting.
Installation
Method 1: Using Package Control
Open Sublime Text.
Press
Ctrl+Shift+P(Windows/Linux) orCmd+Shift+P(macOS) to summon the Command Palette.Type “Package Control: Install Package” and hit
Enter.In the input field, type “MonokaiFree” and select it from the list of available packages.
To activate the MonokaiFree color scheme, go to
Command Palette → UI: Select Color Schemeand choose “MonokaiFree” from the list of available color schemes.
Method 2: Manual Installation
Visit the MonokaiFree GitHub repository.
Click on the “Code” button and choose “Download ZIP.”
Extract the downloaded ZIP file.
Open Sublime Text and navigate to
Preferences -> Browse Packages...to open the Packages folder.Copy the “MonokaiFree” folder from the extracted ZIP and paste it into the Packages folder.
To activate the MonokaiFree color scheme, go to
Command Palette → UI: Select Color Schemeand choose “MonokaiFree” from the list of available color schemes.
Method 3: Manual Git Repository Installation
Open a terminal or command prompt.
Navigate to the Sublime Text Packages directory:
- On Windows: `%APPDATA%\Sublime Text\Packages`
- On macOS: `~/Library/Application Support/Sublime Text/Packages`
- On Linux: `~/.config/sublime-text/Packages`
- Clone the plugin repository directly into the Packages directory using Git:
git clone https://github.com/gerardroche/sublime-monokai-free.git MonokaiFree
- To activate the MonokaiFree color scheme, go to
Command Palette → UI: Select Color Schemeand choose “MonokaiFree” from the list of available color schemes.
Activating the MonokaiFree Color Scheme
To immerse yourself in the MonokaiFree color scheme in Sublime Text, follow these straightforward steps:
Access the Command Palette by pressing
Ctrl+Shift+P(Windows/Linux) orCmd+Shift+P(macOS).In the Command Palette, type
UI: Select Color Scheme.A list of available color schemes will appear. Scroll through the list and select one of the following variants:
- MonokaiFree - The classic Monokai color scheme.
- MonokaiFreeBlue - A variant with a blue color palette.
- MonokaiFreeDark - A darker version of the classic scheme.
- MonokaiYaruDark - A variant inspired by Ubuntu Gnome Yaru Dark.
- MonokaiDracula - A variant with a Dracula-inspired color scheme.
Now you can enjoy coding with the MonokaiFree color scheme that best suits your preferences. Revel in the enhanced visual appeal and readability while crafting code in Sublime Text. Happy coding!
Activating Themes in Sublime Text
To change the theme in Sublime Text, use the Command Palette. Follow these steps to activate your desired theme:
Press
Ctrl+Shift+P(Windows/Linux) orCmd+Shift+P(macOS) to open the Command Palette.In the Command Palette, type
UI: Select Theme.A new list of available themes will appear. Scroll through the list and select one of the following themes:
- Adaptive
- Default
- Default Dark
Now you can work in Sublime Text with your preferred theme, enjoying a visually appealing and customizable coding environment. Happy coding!
Settings
Command Palette → Preferences: Settings
{
    "monokaifree.theme": true,
    "monokaifree.vcs_status_labels": true,
    "monokaifree.vcs_status_badges": true
}
Fonts
Experiment with alternative fonts to enhance your coding experience. Here are some font options to consider:
| Font | Repository | Description |
|---|---|---|
| Fira Code | GitHub | Monospaced font with programming ligatures |
| Cascadia Code | GitHub | Monospaced font designed for coding in Windows Terminal |
| Source Code Pro | GitHub | Monospaced font aimed at coders and text editors |
| Inconsolata | GitHub | Monospaced font for code listings and terminal use |
| Hack | GitHub | Open-source monospaced font for developers |
| JetBrains Mono | GitHub | Typeface designed for coding, legible, and elegant |
| Monoid | GitHub | Unique coding font known for consistent shapes |
| Hasklig | GitHub | Unique coding font known for consistent shapes |
Command Palette → Preferences: Settings
{
    "font_face": "Cascadia Code",
    "font_options": [
        "gray_antialias",
        "ss01", "ss02", "ss03", "ss04",
        "ss05", "ss06", "ss07", "ss08",
        "ss09", "ss10", "ss19", "ss20"
    ]
}
Font Options
Command Palette → Preferences: Settings
{
    "font_options": [
        "no_bold",
        "no_italic"
    ]
}
Available options on all platforms are:
"no_bold": Disables bold text."no_italic": Disables italic text.
Antialiasing options:
"no_antialias": Disables antialiasing."gray_antialias": Uses grayscale antialiasing instead of subpixel.
Ligature options:
"no_liga": Disables standard ligatures (OpenType liga feature)."no_clig": Disables contextual ligatures (OpenType clig feature)."no_calt": Disables contextual alternatives (OpenType calt feature)."dlig": Enables discretionary ligatures (OpenType dlig feature)."ss01": Enables OpenType stylistic set 1. You can enable sets 1 to 10 by changing the last two digits.
Windows-only options:
"directwrite"(default): Use DirectWrite for font rendering."gdi": Use GDI for font rendering."dwrite_cleartype_classic": Only applicable to “directwrite” mode, should render fonts similar to traditional GDI."dwrite_cleartype_natural": Only applicable to “directwrite” mode, should render fonts similar to ClearType “natural quality” GDI."subpixel_antialias": Force ClearType antialiasing when disabled at the system level.
Mac-only options:
"no_round": Don't round glyph widths for monospace fonts when “font_size” is small.
File Icons
Consider using FileIcons to incorporate colorful icons into your sidebar. If you prefer grayscale icons, you can find them here. These icons are compatible with both the Default and Adaptive themes.

Streamlined Status Bar
For a minimalist status bar, follow these steps:
Open the Command Palette by pressing
Ctrl+Shift+P(Windows/Linux) orCmd+Shift+P(macOS).Choose “Preferences: Settings”.
Add the following JSON configuration:
{
       "show_indentation": false,
       "show_line_column": "compact",
       "show_sidebar_button": false,
       "show_syntax": false
   }
This setup simplifies your status bar by removing indentation information, displaying line and column numbers in a compact format, hiding the sidebar button, and omitting syntax information.
File Tabs
For minimalist file tabs, follow these steps:
Open the Command Palette by pressing
Ctrl+Shift+P(Windows/Linux) orCmd+Shift+P(macOS).Choose “Preferences: Settings”.
Add the following JSON configuration:
{
       "file_tab_style": "square",
       "mouse_wheel_switches_tabs": false,
       "show_tab_close_buttons": false
   }
Inactive Sheets
To disable sheet dimming for inactive sheets and make changing input focus less distracting, follow these steps:
Open the Command Palette by pressing
Ctrl+Shift+P(Windows/Linux) orCmd+Shift+P(macOS).Choose “Preferences: Settings”.
Add the following JSON configuration:
{
       "inactive_sheet_dimming": false
   }
This configuration prevents inactive sheets from being dimmed, improving the visibility of the input focus.
Disabling Animations
For a more streamlined interface without animations, you can disable them:
Open the Command Palette by pressing
Ctrl+Shift+P(Windows/Linux) orCmd+Shift+P(macOS).Select “Preferences: Settings”.
Add the following JSON configuration:
{
       "animation_enabled": false
   }
This configuration turns off animations for a more static and efficient visual experience.
Customizing Caret Appearance
Personalize the appearance of the caret by customizing its corner style:
Open the Command Palette by pressing
Ctrl+Shift+P(Windows/Linux) orCmd+Shift+P(macOS).Type and select “UI: Customize Color Scheme”.
Add the following JSON configuration to customize the caret's corner style:
{
       "globals": {
           "block_caret_corner_style": "round"
       }
   }
By implementing this configuration, you'll modify the corner style of the caret, giving it a round touch. This subtle adjustment enhances your overall editing experience.
Customizing Selection Appearance
Personalize the appearance of the selection, particularly its corner style:
Open the Command Palette by pressing
Ctrl+Shift+P(Windows/Linux) orCmd+Shift+P(macOS).Type and select “UI: Customize Color
Scheme”.
- Add the following JSON configuration to customize the corner style of the selection:
{
       "globals": {
           "selection_corner_style": "square"
       }
   }
By applying this configuration, you'll change the corner style of the selection to a square shape. This customization adds a distinctive and visually appealing touch to your selections during editing tasks.
Customizations
Make the color scheme your own with customizations. To do this, navigate to Menu → Preferences → Customize Color Scheme:
{
    "variables": {
        "bg0": "#292C3F",
    },
    "globals": {
        "caret": "yellow",
        "block_caret": "yellow",
        "block_caret_border": "yellow",
        "block_caret_corner_style": "square",
        "selection_corner_style": "square",
        "brackets_options": "foreground bold glow",
    },
    "rules": []
}
Base variables
| COLOR | HEX | R | G | B | Example usage | |
|---|---|---|---|---|---|---|
| 1 | bg0 | #272822 |
39 | 40 | 34 | Background |
| 2 | bg1 | #3e3d32 |
62 | 61 | 50 | Rulers, invisibles |
| 3 | bg2 | #43443b |
Line highlight, selections | |||
| 4 | bg3 | TBD | ||||
| 5 | fg0 | #f8f8f2 |
248 | 248 | 242 | Text |
| 6 | fg1 | #cfcfc2 |
207 | 207 | 194 | Text (soft) |
| 7 | fg2 | #75715e |
117 | 113 | 94 | Comments, selections, gutter text |
| 8 | fg3 | TBD | ||||
| 9 | yellow | #e6db74 |
230 | 219 | 116 | Strings, cursors |
| 10 | orange | #fd971f |
253 | 151 | 31 | Language identifiers, function parameters |
| 11 | red | #f92672 |
249 | 38 | 114 | Control structures, modifiers, operators |
| 12 | magenta | #fd5ff0 |
253 | 95 | 240 | Errors, deprecations, notices |
| 13 | violet | #ae81ff |
174 | 129 | 255 | Constants, numbers, booleans |
| 14 | blue | #66d9ef |
102 | 217 | 239 | Built-in identifiers, declarations, functions |
| 15 | cyan | #a1efe4 |
161 | 239 | 228 | |
| 16 | green | #a6e22e |
166 | 226 | 46 | Class names, function names |
Other variables
| Reference | Description | |
|---|---|---|
| caret | fg0 | Carets, gutter foreground highlight |
| guide | fg1 | Indent guides |
| selection | bg2 | Selections, highlights |
Variants
Variants inherit from the base and functional variables.
Example: Customizing Indent Guides
Menu → Preferences → Customize Color Scheme
{
    "variables": {},
    "globals": {
        "active_guide": "var(green)",
        "guide": "var(blue)",
        "stack_guide": "var(fg2)",
    },
    "rules": []
}
Example: Customizing Caret
Open the Command Palette by pressing
Ctrl+Shift+P(Windows/Linux) orCmd+Shift+P(macOS).Select “UI: Customize Color Scheme”.
Add the following JSON configuration:
{
       "variables": {},
       "globals": {
           "caret": "yellow",
           "block_caret": "yellow",
           "block_caret_border": "yellow",
       },
       "rules": []
   }
Example: Customizing Background
Open the Command Palette by pressing
Ctrl+Shift+P(Windows/Linux) orCmd+Shift+P(macOS).Select “UI: Customize Color Scheme”.
Add the following JSON configuration:
{
       "variables": {
           "bg0": "#292C3F",
       },
       "globals": {},
       "rules": []
   }
Resources
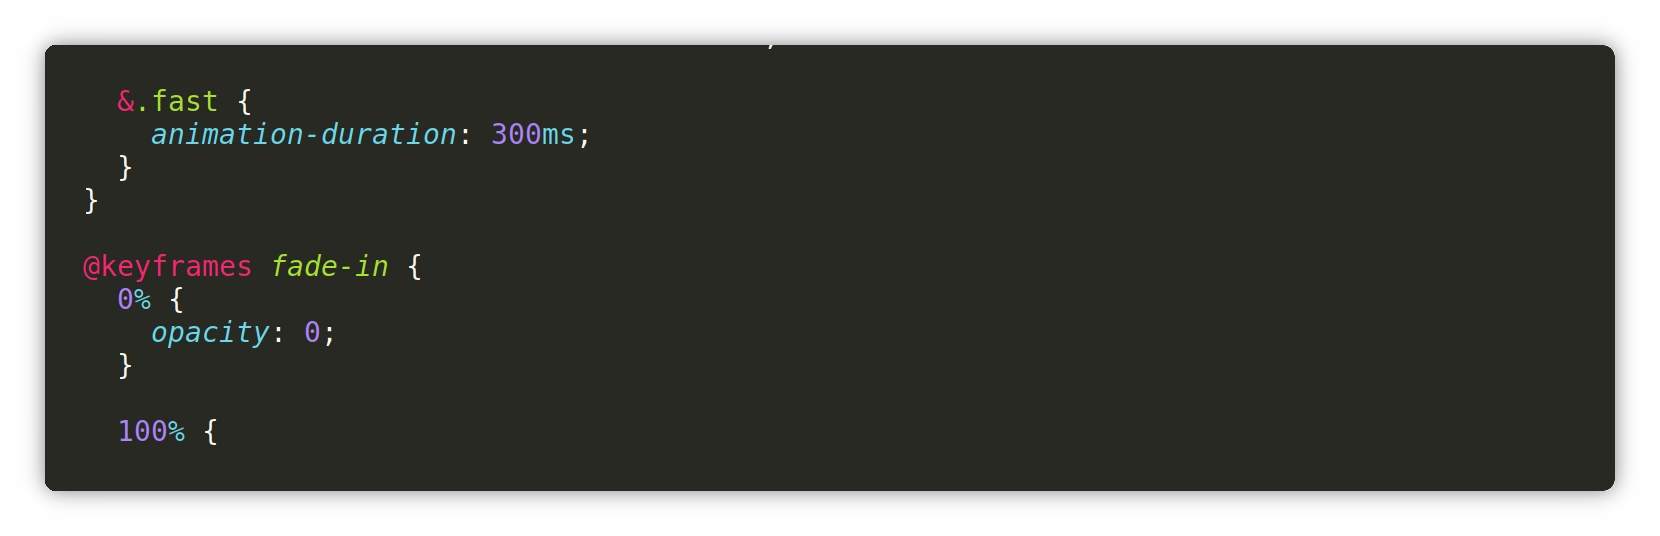
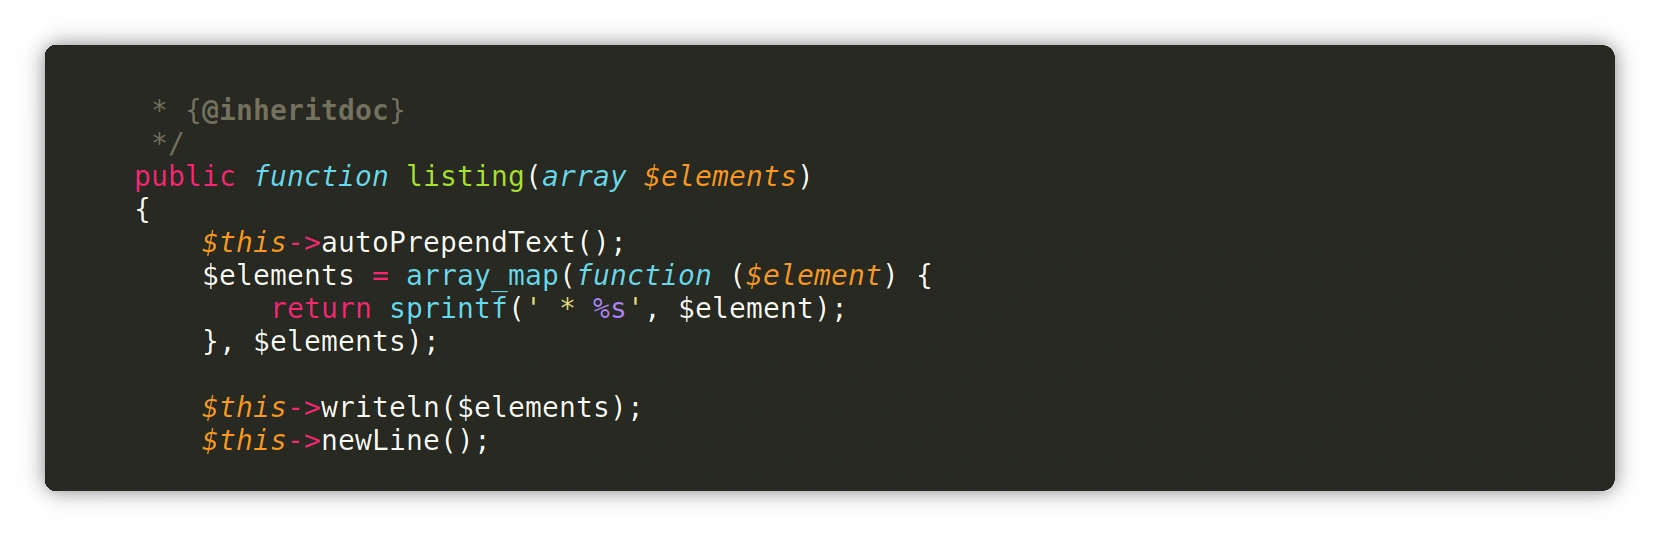
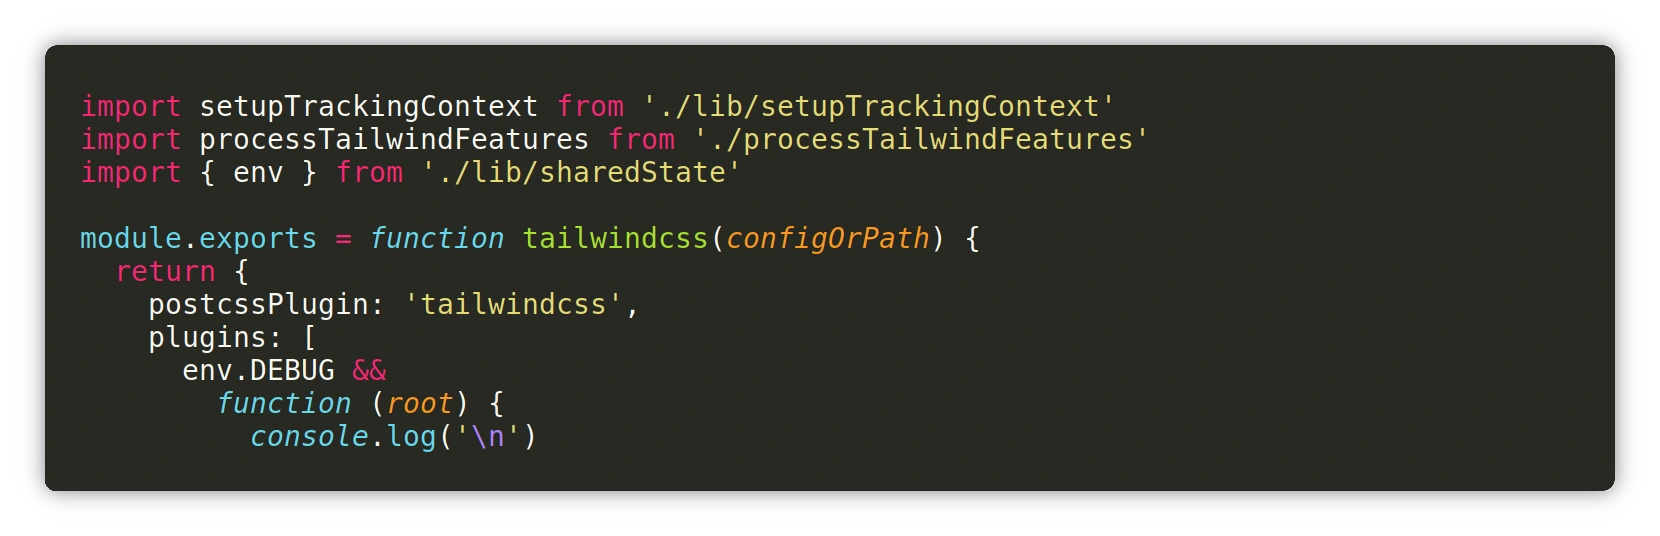
Screenshots
PHP
CSS
JavaScript
Supported syntaxes
Contributing
The MonokaiFree color scheme is an open-source project, and contributions are welcome. If you have suggestions for improvements or encounter any issues, please feel free to submit a pull request or open an issue on the official repository.
Enjoy Coding with MonokaiFree
With the MonokaiFree color scheme, you can elevate your coding experience in Sublime Text, making it more enjoyable and visually appealing. Embrace the vibrant and enhanced color palette to boost productivity and immerse yourself in the world of coding. Happy coding!
License
Released under the GPL-3.0-or-later License.